Here's a follow-up to the drilling work I mentioned... Thankfully, I've learned that less glue is better for 2 reasons: First it'll dry faster and cleaner, second it's easier to snap off mistakes. Here's the post-operation heavy bolter before I glued it back on.

And to be honest, there's nothing else particularly interesting about this build because the rest is the final "turret" assembly. And as I previously said, it barely counts as a turret since it's actually so big is just sits in place and doesn't turn (it makes Baneblade's Vanquisher cannon turret look puny by comparison).
However, I will stop for a moment to show the heavy stubber guns mounted at the back. The instructions rather gloss over their assembly. In fact, the CAD drawing is actually wrong in one part. Firstly, you MUST pay attention to which pieces go on the left or right. The photo below shows the port-side gun (the "bolts" on the panel are at the rear of the vehicle). Also to note, the chain of bullets are on the sprue next to the wrong gun! You'll see when you start test-fitting: the bullets will point backwards if you have the incorrect bit. Lastly, it's not obvious, but the handles are also direction-specific - the handles are longer on the bottom than the top.

And here's what they look like mounted. I took these photos specifically because the literature never shows how the final panels are supposed to go onto the tank - the front part goes
under the hull ledge while the back part (with the bolts) goes
over the hull ledge.


Finally, here are some random pics of the final build before paint. All I can say is I love how much surface detail is on the new pieces. I have a whole new appreciation for the original Baneblade parts too.


 And to be honest, there's nothing else particularly interesting about this build because the rest is the final "turret" assembly. And as I previously said, it barely counts as a turret since it's actually so big is just sits in place and doesn't turn (it makes Baneblade's Vanquisher cannon turret look puny by comparison).
 However, I will stop for a moment to show the heavy stubber guns mounted at the back. The instructions rather gloss over their assembly. In fact, the CAD drawing is actually wrong in one part. Firstly, you MUST pay attention to which pieces go on the left or right. The photo below shows the port-side gun (the "bolts" on the panel are at the rear of the vehicle). Also to note, the chain of bullets are on the sprue next to the wrong gun! You'll see when you start test-fitting: the bullets will point backwards if you have the incorrect bit. Lastly, it's not obvious, but the handles are also direction-specific - the handles are longer on the bottom than the top.
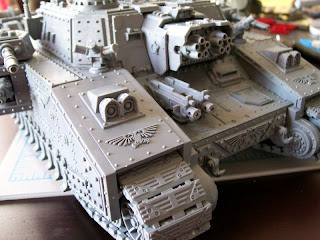
 And here's what they look like mounted. I took these photos specifically because the literature never shows how the final panels are supposed to go onto the tank - the front part goes under the hull ledge while the back part (with the bolts) goes over the hull ledge.
 Finally, here are some random pics of the final build before paint. All I can say is I love how much surface detail is on the new pieces. I have a whole new appreciation for the original Baneblade parts too.


No comments:
Post a Comment