Something I often shy away from is politicking in the real world. It's not really my domain. But I would be socially irresponsible if I did not speak up when I have this opportunity to spread the word.
Here is a very unfortunate incident that happened to a fellow wargaming player... Please take a look if you can.
122nd Cadian: Bad Journalism
Thursday, December 01, 2011
Saturday, November 05, 2011
Hercules: Heavy Labor
Labels:
review,
stuff,
Transformers
My first attempt at a vlog review. Runs about 10 minutes.
As usual it needs not be said that is not for everyone. It's a collector's item with limited production run. MSRP is about normal for this kind of thing, but value is definitely in the eye of the beholder.
As usual it needs not be said that is not for everyone. It's a collector's item with limited production run. MSRP is about normal for this kind of thing, but value is definitely in the eye of the beholder.
!!!UPDATE!!!
Seems I'm not alone with the leg that won't straighten out. TFC has helpfully posted the following instructions for a DIY solution. Good luck!

Wednesday, September 28, 2011
While I've been waiting
So... just as we settled into Labour Day weekend, I received an email from THQ. It was the shipping confirmation for my long-awaited collector's edition of Space Marine on PS3. Little did I realize at the time, long-awaited was about to become even-longer-awaited.
So besides transferring to a new work-area, here's a list of all the things I've accomplished in my spare time NOT playing Space Marine.
So besides transferring to a new work-area, here's a list of all the things I've accomplished in my spare time NOT playing Space Marine.
- Enjoyed a nice reunion with some extended family including a trip back home, and a visit with my brother during the long weekend.
- Finished Spider-Man Shattered Dimensions on PS3.
- Met friends for a night of pool at Dooly's on Member-Mondays. Twice.
- Started and finished reading Star Wars "Allegiance" by Timothy Zahn.
- Hosted an edition of Bad-Video-Game-Movies night at my place for my buddies.
- Completed all challenges in "Dead or Alive Dimensions" on 3DS.
- Built a Lego Technic mobile crane model. Added the Power Functions kit.
- Played Anomaly Warzone Earth nearly to completion (boy does it get hard towards the end).
- Watched all 6 Star Wars films on blu-ray including a massive portion of the bonus features.
- Visited with friends for an impromptu birthday party.
- Watched "The Disappearance of Suzumiya Haruhi." (Epic!)
- Attended a Toronto Maple Leafs @ Ottawa Senators pre-season game.
- Tonight I will begin a new gunpla kit I bought myself at the local specialty shop. It's the over-sized 1/48 scale RX-78 and it'll be awesome.
Saturday, September 17, 2011
8053 Mobile Crane
Labels:
Lego
I never quite warmed up to Lego Technic. It's Lego, but it's not really Lego to me. It doesn't have that elegant simplicity of bricks but instead has complicated bars with connectors, which to me, is the opposite of elegant. But I do still appreciate its inherent genius.
I felt like diving back into this sort of thing after stumbling on a Youtube video about Lego. I chose the Mobile Crane kit because it's suitably complex and is also playable when done.
After the first hour, I felt that usual "Technic Confusion" already. It must take some kind of savant to realize a model from these mechanical innards. I didn't know where the instructions were taking me other than that I was building some kind of chassis. When I got to the point seen in the photo below, I finally saw that I was actually building the brackets for a steering column that would angle the 8 wheels.
 Actually to be more accurate, it figured it out sooner and snapped that photo only after I started on the front cab. But the point is, the model up to then was more or less just a series of bars and with a few seemingly random gears.
To me, thrill of Lego Technic is seeing bits become assemblies, assemblies become parts, and so on. Then that moment you think, "ah! Now I can see how this is supposed to work."
So eventually I got to this...
 At the end of "Bag 1" (which is actually a series of bags), we have what can easily be recognized as a vehicle. A large gear serves as a steering knob at the back while a smaller one swings the stabilizers open and closed. The little feet lower when you twist the black handles.
"Bag 2" is all the for the crane assembly. The crane is where things get very alien to me. The red lever shift a clutch into place to catch a series of gears. Depending on the lever positions, you are raising the arm, or extending it, or lowering the grapple line.
Technic does something else that annoys me a bit: no drivers or pilots. Long ago, I recall some sets had "Technic people" but I'll settle for Little-Prime being able to sit in crane cab: In fact, it bothers me even more than they made seats in the main cab, but there's no room for a passenger's legs. Why couldn't the design be just one or 2 "holes" longer. Even the cab doors open... but for what?
 It also kind of bugs me that although the structure is about as stable as it will get, Lego plastic still has a certain amount of flex. Those stabilizers are cool but not truly functional. And I'm almost afraid to turn the knobs and gears when the fit is just a bit too tight. I expect it to snap at any time, even though it clearly shouldn't.
Still the whole point of this exercise is to make an outrageously large model and it does that just fine. The crane ends up being over half a meter long and just as high if the crane is fully extended and raised. I just wish it weren't so hard to take Technic bits apart because I'm eager to try building the harbour-crane model using the downloadable manual. Maybe I'll give it a few weeks rest. :)
I felt like diving back into this sort of thing after stumbling on a Youtube video about Lego. I chose the Mobile Crane kit because it's suitably complex and is also playable when done.
After the first hour, I felt that usual "Technic Confusion" already. It must take some kind of savant to realize a model from these mechanical innards. I didn't know where the instructions were taking me other than that I was building some kind of chassis. When I got to the point seen in the photo below, I finally saw that I was actually building the brackets for a steering column that would angle the 8 wheels.
 Actually to be more accurate, it figured it out sooner and snapped that photo only after I started on the front cab. But the point is, the model up to then was more or less just a series of bars and with a few seemingly random gears.
To me, thrill of Lego Technic is seeing bits become assemblies, assemblies become parts, and so on. Then that moment you think, "ah! Now I can see how this is supposed to work."
So eventually I got to this...
 At the end of "Bag 1" (which is actually a series of bags), we have what can easily be recognized as a vehicle. A large gear serves as a steering knob at the back while a smaller one swings the stabilizers open and closed. The little feet lower when you twist the black handles.
"Bag 2" is all the for the crane assembly.
 The crane is where things get very alien to me. The red lever shift a clutch into place to catch a series of gears. Depending on the lever positions, you are raising the arm, or extending it, or lowering the grapple line.
Technic does something else that annoys me a bit: no drivers or pilots. Long ago, I recall some sets had "Technic people" but I'll settle for Little-Prime being able to sit in crane cab:
 In fact, it bothers me even more than they made seats in the main cab, but there's no room for a passenger's legs. Why couldn't the design be just one or 2 "holes" longer. Even the cab doors open... but for what?
 It also kind of bugs me that although the structure is about as stable as it will get, Lego plastic still has a certain amount of flex. Those stabilizers are cool but not truly functional. And I'm almost afraid to turn the knobs and gears when the fit is just a bit too tight. I expect it to snap at any time, even though it clearly shouldn't.
Still the whole point of this exercise is to make an outrageously large model and it does that just fine. The crane ends up being over half a meter long and just as high if the crane is fully extended and raised. I just wish it weren't so hard to take Technic bits apart because I'm eager to try building the harbour-crane model using the downloadable manual. Maybe I'll give it a few weeks rest. :)
Friday, August 05, 2011
Hercules: Exgraver
Labels:
review,
stuff,
Transformers
After waiting for months, here he is! The first sixth of Transformers Club's attempt to remake their own version of Devastator. Of course, being that TFC is an unauthorized fan group, they aren't allowed to use trademarked names like Devastator (or Decepticon or Constructicon, for that matter). So this is the first part of "Hercules", he is "Exgraver" and "not Scavenger."
 Not-Scavenger come out pretty well despite the general reaction that he isn't quite up to Hasbro/Takara standards. Exgraver is made of the same type of solid ABS plastic. He stands about 7 inches high (his head to his feet). Everything on him moves - from shoulders to hips, knees to elbows, even his head is on a ball joint allowing him to look up at you from your desk. This is especially important since he also features light-piping in his eyes. And the "Hercules's right arm" configuration doesn't seem like an after-thought either: the arm also has an elbow and wrist, both which rotate and swivel. Not-Devastator's hand even has articulated fingers.
 If he's so posable, does that mean Exgraver is playable? Well... this is where I have to deduct points. Hasbro/Takara are in the business of making kids' toys. And kids can be a little rough. I've noticed in recent Transformers instruction manuals that they specifically say forcing parts may cause them to pop off. They don't break; you simply pop the parts back into place. I don't feel so comfortable here. I feel like if a joint is just a bit too tight, I don't want to force it. Part of this is due to design and part due to implementation.
 One of the first steps in the included instructions is to stow Hercules's hand onto the robot so that it becomes part of his vehicle mode. Well, I discovered that there simply isn't any give. If the hand is in place, there's barely any room to flip the shoulders up and plug into place. Well, there's a little room, but there is the risk of scratching up the parts that meet. I've since discovered it's safer to just reverse the steps - fold up and peg the parts before putting in the giant purple hand.
 Myclone Optimus Prime is exactly 2.5 inches tall, to give you an idea how bulky vehicle mode is. With the "Hercules hand" stowed away there are a few more 5mm holes and pegs around to also plug in the two gun accessories. No baggie required for left-over parts. Exgraver may require parts-swapping for the cab (that is actually plugged into an upside down fist when in vehicle mode) but at least he cleans up after himself. And as you could see in the first photo above there are a variety of ways to plug everything in robot mode as well.
 I can understand the common complaints - that this figure is too expensive for what it is. But let's be serious - TFC is no Hasbro. They accepted a risk to undertake this project, but they aren't stupid. They have shopped around and must have found the best factory they could afford. And in order to make back the costs of a limited production run, they priced their figure accordingly. "Hercules" is not priced for everyone, but those of us who took the plunge should not regret the decision to support the project. Because I can't wait for the next one!
 Not-Scavenger come out pretty well despite the general reaction that he isn't quite up to Hasbro/Takara standards. Exgraver is made of the same type of solid ABS plastic. He stands about 7 inches high (his head to his feet). Everything on him moves - from shoulders to hips, knees to elbows, even his head is on a ball joint allowing him to look up at you from your desk. This is especially important since he also features light-piping in his eyes. And the "Hercules's right arm" configuration doesn't seem like an after-thought either: the arm also has an elbow and wrist, both which rotate and swivel. Not-Devastator's hand even has articulated fingers.
 If he's so posable, does that mean Exgraver is playable? Well... this is where I have to deduct points. Hasbro/Takara are in the business of making kids' toys. And kids can be a little rough. I've noticed in recent Transformers instruction manuals that they specifically say forcing parts may cause them to pop off. They don't break; you simply pop the parts back into place. I don't feel so comfortable here. I feel like if a joint is just a bit too tight, I don't want to force it. Part of this is due to design and part due to implementation.
Do this first... ...then this (the thumb will be behind the head)...
 ...and then this (plug in and then fold fingers over the face).
 ...then this (the thumb will be behind the head)...
 ...and then this (plug in and then fold fingers over the face).
 One of the first steps in the included instructions is to stow Hercules's hand onto the robot so that it becomes part of his vehicle mode. Well, I discovered that there simply isn't any give. If the hand is in place, there's barely any room to flip the shoulders up and plug into place. Well, there's a little room, but there is the risk of scratching up the parts that meet. I've since discovered it's safer to just reverse the steps - fold up and peg the parts before putting in the giant purple hand.
 Myclone Optimus Prime is exactly 2.5 inches tall, to give you an idea how bulky vehicle mode is. With the "Hercules hand" stowed away there are a few more 5mm holes and pegs around to also plug in the two gun accessories. No baggie required for left-over parts. Exgraver may require parts-swapping for the cab (that is actually plugged into an upside down fist when in vehicle mode) but at least he cleans up after himself. And as you could see in the first photo above there are a variety of ways to plug everything in robot mode as well.
The instructions say this... ...but you can do this if you jiggle the black panel a bit...
Last but not least... the obligatory picture of Exgraver's arm-mode. This is going to be a seriously large figure. The hand compares with Optimal Optimus from Beast Wars. The connector for the shoulder joint is not at the very tip but that makes sense as the prototype photos released by TFC have shown that the head and shoulders formed by "Not Hook" will be very beefy.
 ...but you can do this if you jiggle the black panel a bit...
 I can understand the common complaints - that this figure is too expensive for what it is. But let's be serious - TFC is no Hasbro. They accepted a risk to undertake this project, but they aren't stupid. They have shopped around and must have found the best factory they could afford. And in order to make back the costs of a limited production run, they priced their figure accordingly. "Hercules" is not priced for everyone, but those of us who took the plunge should not regret the decision to support the project. Because I can't wait for the next one!
Monday, August 01, 2011
Mess with Nintendo
In case you haven't heard by now, the Big N has been bleeding money this year and in a desperate attempt to increase sales has decided on an early price-drop on the 3DS. The price drops from $250 to $170 on August 12, 2011. However, to appease the faithful, if you had your 3DS before that date (ie: your e-shop login has been active on or before the 11th), then Nintendo is offering you 20 free game downloads...
Here's the deal though. Some retailers have jumped the gun. I got my own 3DS this weekend at Costo (in Canada) for only $170. Or you could also try taking advantage of price protection policies at Best Buy or Futureshop (assuming gaming hardware is covered; best you ask first). In fact, the last I checked, they were offering a "free" accessory bundle with purchase of a 3DS).
So anyway, now we'll see when the e-shop updates on Thursday about whether those free downloads are worth the fuss.
Monday, March 07, 2011
Sideshow Collectibles Clone Trooper
Labels:
Star Wars
I'll be honest: I did not plan this. I was serious when I thought the prices would be a deterrent to buying too many of these Premium Format series sculptures. And even then I thought, "I'll limit myself to collecting only the generic troops." I seriously didn't know a Clone Trooper would be released within 2 months of deciding I would buy the Scout Trooper. The decision came down to this simple fact: buy it now or buy it later at a huge mark-up. I bought it now and it didn't cost anywhere near what a paid for the previous statue. I even got the "Episode III" exclusive head option.
 Unlike the Scout Trooper there never was a physical costume at Lucasfilm for the Clone armoured troops - it was always a CG render in the films. So Sideshow's challenge was to make an interpretation of the suit where all the edges worked together without "cheating." Compared to the Scout Trooper, there's a lot less fabric parts of this figure and generally a lot less details to miniaturize.
 It does feature weathering details - the armour is not a pure white but is covered in a brown of Geonosis dust. He wears a textured body-suit under the armour. And of course, carries a standard-issue rifle. The junked Seperatist battle-droid arm on the ground is also an exclusive option (the statue does come with a "plug" to hide the hold where the optional arm plugs into the base).
Of course, he does come with the regular "Episode 2" head to in case for some reason you got the exclusive version without wanting it...
 But why would you do that?


 The decision came down to this simple fact: buy it now or buy it later at a huge mark-up. I bought it now and it didn't cost anywhere near what a paid for the previous statue. I even got the "Episode III" exclusive head option.
 Unlike the Scout Trooper there never was a physical costume at Lucasfilm for the Clone armoured troops - it was always a CG render in the films. So Sideshow's challenge was to make an interpretation of the suit where all the edges worked together without "cheating." Compared to the Scout Trooper, there's a lot less fabric parts of this figure and generally a lot less details to miniaturize.
 It does feature weathering details - the armour is not a pure white but is covered in a brown of Geonosis dust. He wears a textured body-suit under the armour. And of course, carries a standard-issue rifle. The junked Seperatist battle-droid arm on the ground is also an exclusive option (the statue does come with a "plug" to hide the hold where the optional arm plugs into the base).
Of course, he does come with the regular "Episode 2" head to in case for some reason you got the exclusive version without wanting it...
 But why would you do that?

Saturday, March 05, 2011
Fortres of Redemption Build 3
I didn't forgot about this build, but a bunch of events conspired to keep me away from this project.
 One more look at the walk-way: as you can see now on the completed piece, all the panels cleverly lean into each other. The angles are almost snap-fit.
The turret is the last major assembly to do. This is where Games Workshop's design experience shines. To minimize the number of molds, almost all parts in this kit are double-sided: the turret mount is actually the missle-silo upside-down. And a majority of the parts of the turret itself is symmetrical so all the pieces. For example, the drum is made of 2 halves and the cannons of 2 pairs of left and right halves.
 This step is very time-consuming as I recommend allowing ample time to dry. Use only 2 drops of glue per panel. And I cannot stress enough: always test-fit! The turret is full of moving parts so a single bit of errant glue will ruin your day.
 Fit the drum into groove within the housing and then just a small drop of glue for the opposite panel. Don't worry, you just need enough to help hold it in place. There is a final bottom plate that will hold it all together once glued on.
 Lastly I want to show you why this project too extra long: I was waiting for magnets. Here are some tiny bolter-guns and search-lights. Careful - some of those parts are delicate. One of mine was broken but luckily the tiny bit was found at the bottom of the box with a clean snap and I could glue it back together.
 The lamps can also be made to pivot as long as you're careful with the glue.
 Finally here's what I had planned all along...
 First I use a sharp point to prime a center underneath each bolter and lamp. Then I progressively drill to widen the hole up to about 1/8 inch. I will fit those tiny little magnets you can get at hobby shops... A little bit of putty into the hold and push in the magnet - wait to try. A good trick is too use the entire stack of magnets in your fingers so that you remember exactly which polarity is facing which and you'll also remember to drill and putty the opposite direction later on the opposite part (in my case, which way should face outwards from the spot where I want the guns and lamps to mount).
 Naturally, I also took time to drill proper barrels and ports. I don't know why Games Workshop do not do that since the rest of their parts are often so detailed.
 And at last, a look at the Fortress before priming and painting.


Tuesday, March 01, 2011
Warhammer and candy
I arrived home tonight and in a stroke of perfect timing (unless he was waiting for me, in which case it's kind of creepy) the mailman drove right up as I got out of my car and delivered my package.
I was already expecting this thanks to the tracker information I had. But what I wasn't expecting when I opened the box later was this:
Yes, for some reason the dudes at MiniWarGaming decided to throw in some candy. Which, I suppose is cool. But it's also weird. At first I thought, "that's a clever shock-absorber" but then it occured to me it wouldn't work too well since the rest of the box is fairly snug. So I think I'll just assume it was just them being nice.
I was already expecting this thanks to the tracker information I had. But what I wasn't expecting when I opened the box later was this:
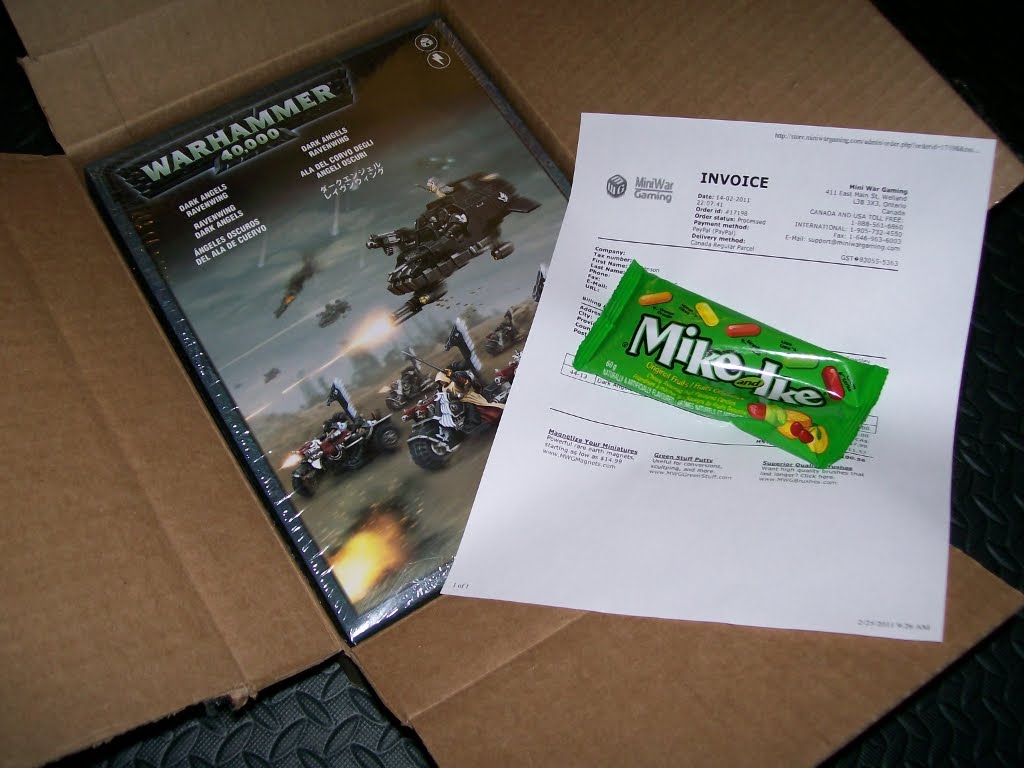
Yes, for some reason the dudes at MiniWarGaming decided to throw in some candy. Which, I suppose is cool. But it's also weird. At first I thought, "that's a clever shock-absorber" but then it occured to me it wouldn't work too well since the rest of the box is fairly snug. So I think I'll just assume it was just them being nice.
Thursday, January 27, 2011
Sideshow Collectibles Scout Trooper
I came to a collector's impasse this past month. Expecting a big overtime pay-out, I wanted to treat myself to something cool and unusual. I looked into high-end collectible "dolls." These 1/6 scale figures are highly detailed and stupidly expensive (often 2 or 3 times the price of Barbie special editions). The problem is that even the 1/6 scales are a dime a dozen: there are literally hundreds to choose from and my local comic book shop alone stocks several lines. I picture myself succumbing to temptation and having yet another army begging for shelf-space.
 But at the top of the heap is Sideshow Collectibles "Premium Format" statue line. Each one is sculpted by an entire team of artists from
traditional poly-stone casting and metal-work to stitched cloth pieces and paint-detailing. Not to mention severely limited production runs. I decided in the end that this was the figure for me: it fits right in with my armoured/mechanized character goods and it's Star Wars. And it's even more stupid-expensive than even I'm usually comfortable with so I won't be tempted to buy too often.
 This is the Scout Trooper from Return of the Jedi. He's the first "troop" character from the line-up (not counting the older speeder-bike riding version). The Scout Trooper features the usual body-suit, padded vest, strapped on armour, and utility-belt. All miniaturized to 1/4 scale. He also features weathering effects painted on his clothes giving him a just-served-his-tour-on-Endor-moon look.


 My version is the "exclusive edition" that came with a sniper rifle accessory. I'm a little annoyed that this is the only part that's exclusive about it. I was willing to pay a bit more than market value because it's a limited run of only 300 (mine is hand-numbered #102 on the base). However, in truth there are 850 of these because there were 550 others that are renumbered and packaged without the rifle.
 As can be seen in the first pic, yes, for the first time my old PS3 looks small by comparison. I can be fairly confident I won't be buying too many of these again soon.
 But at the top of the heap is Sideshow Collectibles "Premium Format" statue line. Each one is sculpted by an entire team of artists from
 traditional poly-stone casting and metal-work to stitched cloth pieces and paint-detailing. Not to mention severely limited production runs.
 I decided in the end that this was the figure for me: it fits right in with my armoured/mechanized character goods and it's Star Wars. And it's even more stupid-expensive than even I'm usually comfortable with so I won't be tempted to buy too often.
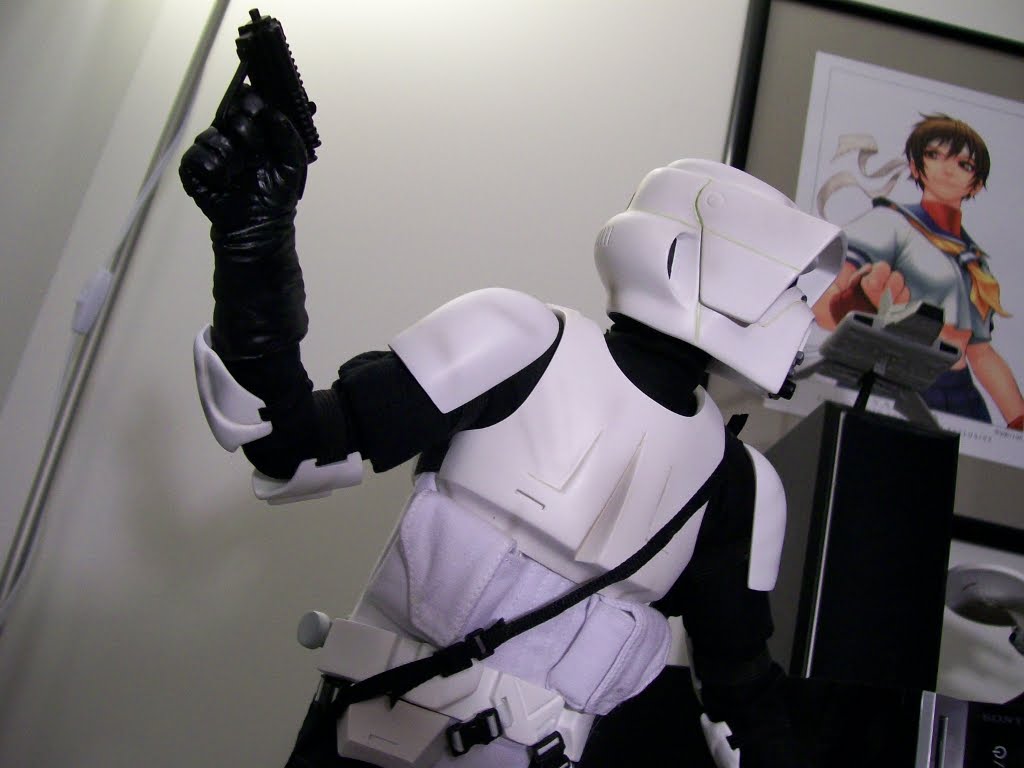 This is the Scout Trooper from Return of the Jedi. He's the first "troop" character from the line-up (not counting the older speeder-bike riding version). The Scout Trooper features the usual body-suit, padded vest, strapped on armour, and utility-belt. All miniaturized to 1/4 scale. He also features weathering effects painted on his clothes giving him a just-served-his-tour-on-Endor-moon look.

 My version is the "exclusive edition" that came with a sniper rifle accessory. I'm a little annoyed that this is the only part that's exclusive about it. I was willing to pay a bit more than market value because it's a limited run of only 300 (mine is hand-numbered #102 on the base). However, in truth there are 850 of these because there were 550 others that are renumbered and packaged without the rifle.
 As can be seen in the first pic, yes, for the first time my old PS3 looks small by comparison. I can be fairly confident I won't be buying too many of these again soon.
Saturday, January 08, 2011
Yamato SDF-1 Macross in 1/3000
I admit I've been pretty lazy with the blog lately choosing instead to post comments on new stuff to forums or an odd pic on Facebook. But since Macross is a series near and dear to my heart, I felt I may as well do a repost of some comments and photos I made over on Robot Japan.
Almost a year ago Yamato teased everyone with an oversized 2 foot long SDF-1 prototype model. For those unaware, toy-designers often build prototypes larger than the final product in order to work out the fine details before scaling it down for production. Well, after the news broke, and people showed enough interest, Yamato actually made a limited run of the master mold in its original 1/2000 scale glory. For your thousands of dollars, you didn't even get a complete toy - you got the parts of the prototype to build your own 2-foot-long model.
I'm not that crazy, so I waited on a pre-order to get the final production version. It's slightly smaller in 1/3000 scale and still doesn't come fully assembled.

That's right, it is remarkably accurate in scale next to the Macross Quarter by Bandai (that one was advertized to be 1/750 scale, which, when the math is done, makes perfect sense).
To give a sense of size (not scale) here are some pics I posted on Robot Japan.
First is the "Storm Attacker" Mode next to a bunch of other Macross figures.

From left to right: 1/60 Destroid, 1/750 Macross Quarter, 1/3000 SDF1, 1/48 Valkyrie, 1/100 Battle-pod.

Not to scale: a Revoltech Giant Robo, a Soul of Chogokin EVA-01, a Brave Gokin Alphonse, Takara's Masterpiece Optimus Prime, and a Max Gokin Godannar.
A few comments: despite being well packed in a classic styrofoam tray, SDF-1 will never be mint in box again once taken out. There are simply too many parts that need to be assembled with glue or else they will pop off. What parts? Well screw covers for one thing. That's right, this is Yamato's final say on the classic anime icon and they did it right. It's so small-scale yet they thought of including a bunch of bits and pieces to hide even the screws!
It's mostly plastic but it's just right. No overly heavy limbs or accessories. Sadly during the photography session, the transformation of the Quarter resulted in the loss the main-gun (i.e. it disconnected itself and fell to the floor, causing a bent tip).
SDF1 will not have this problem. It's delicate where it needs to be (the bridge module up top), but also heavy where it should be (in the torso and legs). It's not as beefy as Optimus Prime despite being larger overall, but that hardly matters. The same design made of metal would have been dangerously unwieldy.
Overall, I'm really happy this finally came out the way it did. For a detailed look at this thing, check out Graham's insane coverage at Macrossworld!
Almost a year ago Yamato teased everyone with an oversized 2 foot long SDF-1 prototype model. For those unaware, toy-designers often build prototypes larger than the final product in order to work out the fine details before scaling it down for production. Well, after the news broke, and people showed enough interest, Yamato actually made a limited run of the master mold in its original 1/2000 scale glory. For your thousands of dollars, you didn't even get a complete toy - you got the parts of the prototype to build your own 2-foot-long model.
I'm not that crazy, so I waited on a pre-order to get the final production version. It's slightly smaller in 1/3000 scale and still doesn't come fully assembled.

That's right, it is remarkably accurate in scale next to the Macross Quarter by Bandai (that one was advertized to be 1/750 scale, which, when the math is done, makes perfect sense).
To give a sense of size (not scale) here are some pics I posted on Robot Japan.
First is the "Storm Attacker" Mode next to a bunch of other Macross figures.


A few comments: despite being well packed in a classic styrofoam tray, SDF-1 will never be mint in box again once taken out. There are simply too many parts that need to be assembled with glue or else they will pop off. What parts? Well screw covers for one thing. That's right, this is Yamato's final say on the classic anime icon and they did it right. It's so small-scale yet they thought of including a bunch of bits and pieces to hide even the screws!
It's mostly plastic but it's just right. No overly heavy limbs or accessories. Sadly during the photography session, the transformation of the Quarter resulted in the loss the main-gun (i.e. it disconnected itself and fell to the floor, causing a bent tip).
SDF1 will not have this problem. It's delicate where it needs to be (the bridge module up top), but also heavy where it should be (in the torso and legs). It's not as beefy as Optimus Prime despite being larger overall, but that hardly matters. The same design made of metal would have been dangerously unwieldy.
Overall, I'm really happy this finally came out the way it did. For a detailed look at this thing, check out Graham's insane coverage at Macrossworld!
Subscribe to:
Posts (Atom)


