This video spoofs Mortal Kombat, but seriously, it's applicable to all fighting games in general...
Saturday, December 05, 2009
Sunday, November 08, 2009
Unboxing: Yamato life-sized replica VF-1 helmet
Months ago, the opportunity to order one came up and believe me, it made me delay a few other things. This was effectively made-to-order since I don't blame any retailer for not wanting to stock this insanely expensive (but so freaking exclusive) item without a pre-order. In fact, it was so hard to come by, I wasn't even sure my order would ever arrive and if I would end up with just a refund 6 months later. There it was... Apparently nothing ships from Toy-Wave.com without some. Even if that's the original shipping box from their own distributors. Next I looked at was the declarations documentation. Frequently these make the difference between practically "free" and the likes of my Macross-themed jacket where I paid over a hundred bucks in duty and taxes. In this case, written all over the box was a declared value of $3000HKD (that's about $425CAD)... and for some mysterious reason, Customs didn't charge me a single penny for duty except for about $20 for federal sales tax and a handling fee. I've given up on figuring out the CBSA.
 Openning the shipping box reveals that it literally is the shipping box and nothing else. It's fit exactly to the retail packaging with no room to spare.
 Interestingly enough, the retail packaging is nothing more than a plastic wrap and a cardboard slip around a huge styrofoam affair.
 What's a nice touch of class is a pair of white cotton gloves so I can pretend this is a ridiculously expensive collector's item up for auction. No wait, only the auction part is pretend, the rest is real. ^_^;;;
 And there it is in all it's glory. This this thing is simply huge. The replica is made to imitate the line-art proportions from the Macross animation work. The visor is supposed to house the eye-tracking targetting systms but of course, this replica is made of solid fibre-glass resin... so while my head fits in it, but it's so front-heavy that it won't sit properly without tilting forward. What the photos don't really convey is how beautiful it is in person. It's painted to a pearlescent finish and there's not a hint of over-spray anywhere. It will definitely get a spot of honour above my display.
 There it was... Apparently nothing ships from Toy-Wave.com without some. Even if that's the original shipping box from their own distributors. Next I looked at was the declarations documentation. Frequently these make the difference between practically "free" and the likes of my Macross-themed jacket where I paid over a hundred bucks in duty and taxes. In this case, written all over the box was a declared value of $3000HKD (that's about $425CAD)... and for some mysterious reason, Customs didn't charge me a single penny for duty except for about $20 for federal sales tax and a handling fee. I've given up on figuring out the CBSA.
 Openning the shipping box reveals that it literally is the shipping box and nothing else. It's fit exactly to the retail packaging with no room to spare.
 Interestingly enough, the retail packaging is nothing more than a plastic wrap and a cardboard slip around a huge styrofoam affair.
 What's a nice touch of class is a pair of white cotton gloves so I can pretend this is a ridiculously expensive collector's item up for auction. No wait, only the auction part is pretend, the rest is real. ^_^;;;
 And there it is in all it's glory. This this thing is simply huge. The replica is made to imitate the line-art proportions from the Macross animation work. The visor is supposed to house the eye-tracking targetting systms but of course, this replica is made of solid fibre-glass resin... so while my head fits in it, but it's so front-heavy that it won't sit properly without tilting forward. What the photos don't really convey is how beautiful it is in person. It's painted to a pearlescent finish and there's not a hint of over-spray anywhere. It will definitely get a spot of honour above my display.
Saturday, November 07, 2009
Planechase deck box
Labels:
Magic: The Gathering
Two whole months after the Planechase sets came out, I finally found the Planechase deck boxes at my local comics and gaming shop. There seem to be only 2 models available - one themed for Grixis (and or Zombies in general) and I got this one which is combination theme for the artifacts deck and the "Strike Force" red-white deck which I happen to play. The box is a typical Duel Deck-Box with an interior space that would normally fit two standard sized Ultra-Pro deck boxes. However, this set comes with a plastic divider to compartmentalize the interior into a space large enough for Planechase cards and about a deck and a half of normal cards.
 The highlight of the set is that comes with Ultra-Pro premium sleeves for the Plane-chase cards. They are matte black on the back and have the Ultra-Pro hologram-seal on the fronts. Surprisingly, they are "top-load" - the cards go in oriented bottom-in-first even though the Planechase cards, unlike normal M:tG cards, are "sideways" (wider than they are tall). The set also comes with 60 normal sized premium sleeves. These are glossy on the back with an image of the standard back of a M:tG card (in case you forget what game you're playing in the middle of your match!).
 The downside, which kind of annoys me, is that the unique divider provides way too much room for the Planechase cards. The divider board fits so that it divides the box into 2 halves and then the front half into two quarters. That means the thickness of a 60-card deck won't fit into one of the quarters and must partially be stored on the second quarter. This doesn't leave enough room for a second deck (but it should have, if the divider sat slightly farther back).
 The box is a typical Duel Deck-Box with an interior space that would normally fit two standard sized Ultra-Pro deck boxes. However, this set comes with a plastic divider to compartmentalize the interior into a space large enough for Planechase cards and about a deck and a half of normal cards.
 The highlight of the set is that comes with Ultra-Pro premium sleeves for the Plane-chase cards. They are matte black on the back and have the Ultra-Pro hologram-seal on the fronts. Surprisingly, they are "top-load" - the cards go in oriented bottom-in-first even though the Planechase cards, unlike normal M:tG cards, are "sideways" (wider than they are tall). The set also comes with 60 normal sized premium sleeves. These are glossy on the back with an image of the standard back of a M:tG card (in case you forget what game you're playing in the middle of your match!).
 The downside, which kind of annoys me, is that the unique divider provides way too much room for the Planechase cards. The divider board fits so that it divides the box into 2 halves and then the front half into two quarters. That means the thickness of a 60-card deck won't fit into one of the quarters and must partially be stored on the second quarter. This doesn't leave enough room for a second deck (but it should have, if the divider sat slightly farther back).
Tuesday, November 03, 2009
T-shirts delivery
Labels:
stuff
A bunch of new T-shirts arrived in the mail this week so I wanted to share them.
Machine56 is an independent designer from Indonesia. You can check out his art on DeviantArt here. His last major line-up features some kind of cyborg skeleton guy with headphones. It's neat!
 I also pre-ordered these Mobile Suit Gundam shirts a couple of months ago. I was a little worried because at the time I had forgotten about the whole Japan standard sizing being smaller than elsewhere. Thankfully, for some reason these L-sized shirts fit me just fine.
 This shirt's colours and pattern is designed to resemble the uniform of a naval officer in the Earth Federation Space Force. Since I couldn't decide which to get (and they aren't terribly expensive as far as novelty-shirts go, I also ordered the brown base-command shirt as well).

Machine56 is an independent designer from Indonesia. You can check out his art on DeviantArt here. His last major line-up features some kind of cyborg skeleton guy with headphones. It's neat!

 I also pre-ordered these Mobile Suit Gundam shirts a couple of months ago. I was a little worried because at the time I had forgotten about the whole Japan standard sizing being smaller than elsewhere. Thankfully, for some reason these L-sized shirts fit me just fine.
 This shirt's colours and pattern is designed to resemble the uniform of a naval officer in the Earth Federation Space Force. Since I couldn't decide which to get (and they aren't terribly expensive as far as novelty-shirts go, I also ordered the brown base-command shirt as well).
Wednesday, October 28, 2009
Wearing a Valkyrie
I couldn't help myself... It's a little tacky but it's rare and limited outside of Japan. And on top of which, I'm a long time Macross/Robotech fan. This Valkyrie-themed jacket caught my attention right away. It was just a matter of finding a means to acquire an item intended only for the Japanese market exclusively (because well, I'm pretty certain Harmony Gold would have something to say about their international rights for the Robotech brand). And I couldn't help wearing it. I had to at least once. During the course of the day I gradually discovered the little features all over the jacket.The most distinguishing feature is the VF-1 regalia. Everyone keeps calling it a "flight jacket" but it isn't a cosplay piece (everyone knows the pilot's uniform on Macross was a plain white and red jumpsuit). From the shoulders down the sleeves, the jacket resembles the paint scheme on Hikaur Ichijio's Valkyrie fighter. Details include embroidered UN-Spacy logos, appropriate craft numbers, and of course carrier name. A real embroided name patch for Skull-leader with Ichijio's name is on the chest. For that authentic military touch, the patch is held by velcro.
 There are a some compartments of questionable practicality. The side pockets are button-closed (the left pocket has the official-licensed product seal inside of it). There is a pocket just inside the left breast. Lastly there's also a large compartment inside the back. For the life of me, I can't figure out what that's for. It seems to follow the entire length and I can't imagine the jacket being particularly comfortable if I were to put something in there. However, there is yet another little hole behind that pocket coming out to one of the velcro clasps on the back. I have no clue what this is for either.
 My jacket is sized "Large." The lengths fit me perfect (I rarely find anything where the sleeves actually stop of my wrists). But I don't know if I have a bulky frame or what, but it's very close-fitting. Am I disappointed? Not really, I plan to treat this as a collector's item more than an actual jacket. And in that respect, how far does it reach up the geek-o-meter? Very high.
 And I couldn't help wearing it. I had to at least once. During the course of the day I gradually discovered the little features all over the jacket.The most distinguishing feature is the VF-1 regalia. Everyone keeps calling it a "flight jacket" but it isn't a cosplay piece (everyone knows the pilot's uniform on Macross was a plain white and red jumpsuit). From the shoulders down the sleeves, the jacket resembles the paint scheme on Hikaur Ichijio's Valkyrie fighter. Details include embroidered UN-Spacy logos, appropriate craft numbers, and of course carrier name. A real embroided name patch for Skull-leader with Ichijio's name is on the chest. For that authentic military touch, the patch is held by velcro.
The groovy feature is the music-player storage system. The forearms have zippered compartments for a portable device. The left sleeve has a velcro shaft to hold down an ear-phone wire. The velcro clasps continue right up to the colar. I'm sure Minmay would have approved. And it has the requisite "Engrish" not to be missed!
 And it has the requisite "Engrish" not to be missed!
 There are a some compartments of questionable practicality. The side pockets are button-closed (the left pocket has the official-licensed product seal inside of it). There is a pocket just inside the left breast. Lastly there's also a large compartment inside the back. For the life of me, I can't figure out what that's for. It seems to follow the entire length and I can't imagine the jacket being particularly comfortable if I were to put something in there. However, there is yet another little hole behind that pocket coming out to one of the velcro clasps on the back. I have no clue what this is for either.
 My jacket is sized "Large." The lengths fit me perfect (I rarely find anything where the sleeves actually stop of my wrists). But I don't know if I have a bulky frame or what, but it's very close-fitting. Am I disappointed? Not really, I plan to treat this as a collector's item more than an actual jacket. And in that respect, how far does it reach up the geek-o-meter? Very high.
Tuesday, October 06, 2009
Imperial Guard Valkyrie 4
The Valkyrie build was delayed for a variety of reasons, but here's the final follow up.
First I wanted to turn the kit over and present possibly the ONLY image of the underside of the model anywhere. It's not clear from the instruction sheet nor from the photos. But the hatches don't have anything holding them in place until you finally put the wings and tail fins in place. Once everything's together, the hatches sort of get sandwiched in the grooves naturally. You'll wonder how it wasn't so obvious before you test-fit everything. Another trick I had to ask for help with is the canopy over the cockpit. Firstly, do the easy thing: base coat the "window frame" bits first. Just remember to leave the underside unpainted because that's where your glue will make contact! While you're at it, carefully tape off the windows leaving only the horizontal cross-bars that are molded into the clear plastic. These "bumps" will form part of the frames on the finished model so you'll need to paint that too.
 Here's a shot of the finished canopy resting on top of the cockpit assembly. Don't glue it in place yet!
 Why not, you may ask? I painted the interior first for a reason. The finished canopy will serve as a conveniently cockpit-shaped template. How? Here's an easy trick for basecoating: wrap the finished canopy in plastic-food-wrap then sit it on top of the cockpit you want to protect. Plastic wrap is easy to hold together and easier to remove when you're done spraying!
 And finally... the photos you've been waiting for. This is after a coat of black, then a dusting coat of generic olive-drab green. A touch of randomness is done by holding up a sheet of card-stock with holes in it. And a final touch: sky-gray on the bottom... look it up, there's a reason for this paint scheme on military aircraft. Finally weathering is done with a combination of more chaos black, tin bitz, and boltgun metal from Citadel Colour paints.

First I wanted to turn the kit over and present possibly the ONLY image of the underside of the model anywhere. It's not clear from the instruction sheet nor from the photos. But the hatches don't have anything holding them in place until you finally put the wings and tail fins in place. Once everything's together, the hatches sort of get sandwiched in the grooves naturally. You'll wonder how it wasn't so obvious before you test-fit everything.
 Another trick I had to ask for help with is the canopy over the cockpit. Firstly, do the easy thing: base coat the "window frame" bits first. Just remember to leave the underside unpainted because that's where your glue will make contact! While you're at it, carefully tape off the windows leaving only the horizontal cross-bars that are molded into the clear plastic. These "bumps" will form part of the frames on the finished model so you'll need to paint that too.
 Here's a shot of the finished canopy resting on top of the cockpit assembly. Don't glue it in place yet!
 Why not, you may ask? I painted the interior first for a reason. The finished canopy will serve as a conveniently cockpit-shaped template. How? Here's an easy trick for basecoating: wrap the finished canopy in plastic-food-wrap then sit it on top of the cockpit you want to protect. Plastic wrap is easy to hold together and easier to remove when you're done spraying!
 And finally... the photos you've been waiting for. This is after a coat of black, then a dusting coat of generic olive-drab green. A touch of randomness is done by holding up a sheet of card-stock with holes in it. And a final touch: sky-gray on the bottom... look it up, there's a reason for this paint scheme on military aircraft. Finally weathering is done with a combination of more chaos black, tin bitz, and boltgun metal from Citadel Colour paints.

Tuesday, September 22, 2009
Sunday, September 13, 2009
Planetstrike kits
Today I'm bringing you a look at the Planetstrike scenery kits (which if you got a chance to check out the new expansion book, serve as more than just scenery). We'll start with the Aegis Defense Line kit.
 As you can see, there's very little to the set. There are 4 long walls and 4 short ones coming on a pair of sprues. Slap some paint on and you're done. The only thing to assemble is the quad-cannon model which will come in handy if you decide to leave the base and the gun unglued. The Planetstrike line has a common feature in most parts: the hatches or mounts for turrets are all the same size so they're interchangeable.
 The Imperial Bastion comes on 6 sprues. The walls for the main structure are on 2 pairs while the rest of the stuff including the Comms Relay and Lascannon are on their own.
 The first thing to do is to start with adding corner joints - you need that angle to start off the structure just like the Cities of Death kits from a few years ago. Next, use a main deck panel to help text fit the walls together, this will help get as close to a proper 90-degree angle as possible.
 Don't worry about perfection. The plastic has just enough give that you will be able to press the next parts together on top. More importantly, lay down the deck without glue. Friction between levels will keep the parts together! And that's how this kit becomes modular as described in the Planetstrike book. Just remember to test-fit everything on top of the previous level and glue only the walls you want to hold. In the end, you end up with this:
 Note the deck panels are reversible so you have the option of reassembling the Bastion with or without the mounting point on the roof like so:
 Of course, building the kit to take advantage of its modular nature means you can do this (using the quad-cannon from the Aegis Defense Line kit and removing the middle level from the Bastion):
 Or change the prop on the roof to suit the mission scenario you are playing:

 Or try to use everything since the Bastion kit comes with a variety of ground-deployment bases. Mix and match parts to offer some dynamic looking setups.


 Remember, if you shop smart, you can assemble an Imperial Strongpoint (a limited direct-market release from earlier this year) simply buy collecting 2 Bastion kits and 3 Aegis Defense Lines. It's tricky, but it can be done for the same price as the limited offer.

 As you can see, there's very little to the set. There are 4 long walls and 4 short ones coming on a pair of sprues. Slap some paint on and you're done. The only thing to assemble is the quad-cannon model which will come in handy if you decide to leave the base and the gun unglued. The Planetstrike line has a common feature in most parts: the hatches or mounts for turrets are all the same size so they're interchangeable.
 The Imperial Bastion comes on 6 sprues. The walls for the main structure are on 2 pairs while the rest of the stuff including the Comms Relay and Lascannon are on their own.
 The first thing to do is to start with adding corner joints - you need that angle to start off the structure just like the Cities of Death kits from a few years ago. Next, use a main deck panel to help text fit the walls together, this will help get as close to a proper 90-degree angle as possible.
 Don't worry about perfection. The plastic has just enough give that you will be able to press the next parts together on top. More importantly, lay down the deck without glue. Friction between levels will keep the parts together! And that's how this kit becomes modular as described in the Planetstrike book. Just remember to test-fit everything on top of the previous level and glue only the walls you want to hold. In the end, you end up with this:
 Note the deck panels are reversible so you have the option of reassembling the Bastion with or without the mounting point on the roof like so:
 Of course, building the kit to take advantage of its modular nature means you can do this (using the quad-cannon from the Aegis Defense Line kit and removing the middle level from the Bastion):
 Or change the prop on the roof to suit the mission scenario you are playing:
 Or try to use everything since the Bastion kit comes with a variety of ground-deployment bases. Mix and match parts to offer some dynamic looking setups.

 Remember, if you shop smart, you can assemble an Imperial Strongpoint (a limited direct-market release from earlier this year) simply buy collecting 2 Bastion kits and 3 Aegis Defense Lines. It's tricky, but it can be done for the same price as the limited offer.
Wednesday, September 02, 2009
Gotta catch'em all
Labels:
PVC figure,
stuff
It's been a long time but I finally finished up my collection of Melancholy of Suzumiya Haruhi figures by FREEing and Good Smile Company. The tale goes all the way back to wanting to support my local store but if they couldn't get it in stock within the first 3 months of release it was looking more and more like eBay was the way to go. Sadly, also costing me an arm and a leg more than it should have been at retail. The box is surprisingly small. I was under the mistaken impression that since Ryoko is posed lengthwise it might be extra large - possibly larger than the box for Yuki.
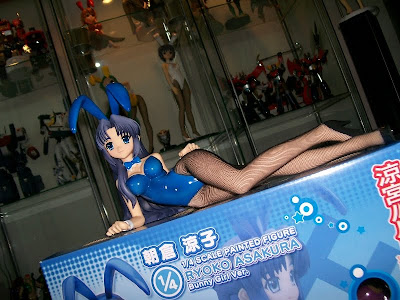 I'm very pleased that she's finally here. In fact the only thing I find perculiar is that her stocking is stretched away from the back of her bent knee. Never noticed that in any other peoples' review photos. I wonder if it's a defect. Anyway, here is Ryoko with the rest of the cast ...finally.


 The box is surprisingly small. I was under the mistaken impression that since Ryoko is posed lengthwise it might be extra large - possibly larger than the box for Yuki.
 I'm very pleased that she's finally here. In fact the only thing I find perculiar is that her stocking is stretched away from the back of her bent knee. Never noticed that in any other peoples' review photos. I wonder if it's a defect. Anyway, here is Ryoko with the rest of the cast ...finally.

Tuesday, August 11, 2009
Thursday, July 30, 2009
Monty Oum's Dead Fantasy V
Labels:
Dead Fantasy,
watching,
web
Out of nowhere Monty Oum rushes out part 5 of his CG-animated pet project only a few weeks after part 4 was posted.
In this installment Monty eases off on the action a bit and builds on the narrative started in part 3. The Kasumi clones (taken from DOA2) arc appears to be capped off. And the Tifa's saga continues in Kill Bill fashion. In fact, I jokingly thought to myself, "taking a page out of the Ninja Gaiden 2 gore-fest, are we?" when guess who makes a cameo appearance before the end of the clip
Download it at Gametrailers in HD or of course...
Tuesday, July 21, 2009
Monty Oum's Dead Fantasy III and IV
Labels:
Dead Fantasy,
watching,
web
Last year Monty Oum, a maniacal genius of action choreography and animation unleashed Dead Fantasy. It was a bold experiment merging fan-favourite franchises DOA and Final Fantasy in an crazy Matrix-inspired show-down. The first chapter was successfully cut together a dynamic tag-team fight scene while the second took things even further by turning up the difficulty on the action-photography by throwing up to 6 additional characters into the mix for a head-spinning 10 minutes of animation.
Previously it was a bit difficult to tell, but Monty Oum hasn't ripped the character models from source, these are custom. In the third installment the experiment introduces new edit tricks (feels kind of like watching a movie trailer) and more detail on the facial expressions as reducing the number characters helps us get a closer look. Tifa's design looks like a half-way between her Advent Children appearance and her original FFVII face... it's a little unsettling but that's not what we're here for.
http://www.gametrailers.com/video/dead-fantasy-monty-oum/52613
In the fourth installment (which Monty Oum surprised us with by posting only a few weeks after the 3rd chapter was released), the environment is new and improved. Ocean, grass fields, and lonely desert roads surround our heroes. The wide open spaces also allow for some vast camera swings as Yuna goes back to her classic costume for some Summoner action.
http://www.gametrailers.com/player/52837.html
From what I gather this is all just a pet project for Monty Oum as I hear he's got a pretty sweet industry job since the Dead Fantasy debut. I hope he doesn't drop this project because he's got some serious fans on Gametrailers.com
Monday, July 20, 2009
Lament for Lunar
Labels:
gaming
To mark the 40th anniversary of the Apollo lunar landing, I will take this time to lament the Lunar game franchise. Lunar is possibly the saddest franchise in gaming. It came and went and then came again huge... and then went again. It tried and failed for a three-peat. You probably missed Lunar. But for those of us lucky enough to have experienced The Silver Star Story, it was amazing and here are some pics of my copy of it.
 The games were originally Sega CD releases. One of the early attempts at using CD for console gaming, this was a Genesis add-on drive. The games were packed epics and featured lengthy cut-scenes to drive the plot. Many years later, the games were remade and featured full-frame anime cinematics to bring everything to life.
 Silver Star Story Complete came on 2 game discs, an audio CD soundtrack with songs and all the rerecorded music, and a PS1-proprietary format disc that played a half-hour behind-the-scenes video. The box also contained a hardback manual featuring a partial walkthrough and a cloth map of the fictional world.
 The sequel, Eternal Blue Complete, also made a return engagement with even more ridiculousness. It included a box of stuff like a soundtrack CD and a replica medallion worn by the heroine.Sadly, that was the final hurrah for Lunar. When "Dragon Song" appeared on DS, it was so far removed from that time-line, it was hardly recognizable anymore. In fact, I think the saddest thing about this is that the remakes video renders were so good (beyond 16-bit, but before DVD existed). As it was, the game was English-only including dubbed songs (while the singer has a sweet voice, she had some very awkward lyrics to work with). It would be another few years before I managed to find MP3s of the Japanese songs. The Lunar franchise is a relic of the 90's and we can only wonder if it will ever rise again.
Sunday, July 12, 2009
Sunday, July 05, 2009
Imperial Guard Valkyrie 3
Easily the most irritating assembly of every vehicle kit I've ever built in my life, is the cockpit. You reach a point where everything is down to an art-form and a science. But every kit throws a little something different at you. The Valkyrie is no different.
 As with many cockpit assemblies, the Valkyrie uses the usual "fake legs" pilot figures. These pilots have no feet. They're just torsos with arms and heads. The tough choice tackling a new sculpt is trying to figure out what you can get away with because you know certain bits will be forever hidden from view once it's done.
 As you can see, the most visible parts are the heads and the control panels. In fact, you could mostly get away with base-coating the arms entirely. That said, as is typical, the easiest way to work with a cockpit is to do the paint details by dry-brushing before putting the assembly into the rest of the nose of the vehicle.

 Also to note, the biggest display screen on the RIO's panel? Just use a bit of yellow to fake some tactical info. When the canopy is in place you'll barely be able to tell what's there anyway.

 As with many cockpit assemblies, the Valkyrie uses the usual "fake legs" pilot figures. These pilots have no feet. They're just torsos with arms and heads. The tough choice tackling a new sculpt is trying to figure out what you can get away with because you know certain bits will be forever hidden from view once it's done.
 As you can see, the most visible parts are the heads and the control panels. In fact, you could mostly get away with base-coating the arms entirely. That said, as is typical, the easiest way to work with a cockpit is to do the paint details by dry-brushing before putting the assembly into the rest of the nose of the vehicle.
 Also to note, the biggest display screen on the RIO's panel? Just use a bit of yellow to fake some tactical info. When the canopy is in place you'll barely be able to tell what's there anyway.
Subscribe to:
Posts (Atom)


