Showing posts with label gaming. Show all posts

Wednesday, September 28, 2011

While I've been waiting

So... just as we settled into Labour Day weekend, I received an email from THQ. It was the shipping confirmation for my long-awaited collector's edition of Space Marine on PS3. Little did I realize at the time, long-awaited was about to become even-longer-awaited.

So besides transferring to a new work-area, here's a list of all the things I've accomplished in my spare time NOT playing Space Marine.
  1. Enjoyed a nice reunion with some extended family including a trip back home, and a visit with my brother during the long weekend.
  2. Finished Spider-Man Shattered Dimensions on PS3.
  3. Met friends for a night of pool at Dooly's on Member-Mondays. Twice.
  4. Started and finished reading Star Wars "Allegiance" by Timothy Zahn.
  5. Hosted an edition of Bad-Video-Game-Movies night at my place for my buddies.
  6. Completed all challenges in "Dead or Alive Dimensions" on 3DS.
  7. Built a Lego Technic mobile crane model. Added the Power Functions kit.
  8. Played Anomaly Warzone Earth nearly to completion (boy does it get hard towards the end).
  9. Watched all 6 Star Wars films on blu-ray including a massive portion of the bonus features.
  10. Visited with friends for an impromptu birthday party.
  11. Watched "The Disappearance of Suzumiya Haruhi." (Epic!)
  12. Attended a Toronto Maple Leafs @ Ottawa Senators pre-season game.
  13. Tonight I will begin a new gunpla kit I bought myself at the local specialty shop. It's the over-sized 1/48 scale RX-78 and it'll be awesome.
I just wish the Internet would stop talking about how freaking awesome Space Marine is... either that or I wish "Snail-Mail" didn't have to reaffirm how well-deserved its nickname was.

Monday, August 01, 2011

Mess with Nintendo

In case you haven't heard by now, the Big N has been bleeding money this year and in a desperate attempt to increase sales has decided on an early price-drop on the 3DS. The price drops from $250 to $170 on August 12, 2011. However, to appease the faithful, if you had your 3DS before that date (ie: your e-shop login has been active on or before the 11th), then Nintendo is offering you 20 free game downloads...

Here's the deal though. Some retailers have jumped the gun. I got my own 3DS this weekend at Costo (in Canada) for only $170. Or you could also try taking advantage of price protection policies at Best Buy or Futureshop (assuming gaming hardware is covered; best you ask first). In fact, the last I checked, they were offering a "free" accessory bundle with purchase of a 3DS).

So anyway, now we'll see when the e-shop updates on Thursday about whether those free downloads are worth the fuss.

Saturday, March 05, 2011

Fortres of Redemption Build 3

I didn't forgot about this build, but a bunch of events conspired to keep me away from this project.
One more look at the walk-way: as you can see now on the completed piece, all the panels cleverly lean into each other. The angles are almost snap-fit.

The turret is the last major assembly to do. This is where Games Workshop's design experience shines. To minimize the number of molds, almost all parts in this kit are double-sided: the turret mount is actually the missle-silo upside-down. And a majority of the parts of the turret itself is symmetrical so all the pieces. For example, the drum is made of 2 halves and the cannons of 2 pairs of left and right halves.
This step is very time-consuming as I recommend allowing ample time to dry. Use only 2 drops of glue per panel. And I cannot stress enough: always test-fit! The turret is full of moving parts so a single bit of errant glue will ruin your day.
Fit the drum into groove within the housing and then just a small drop of glue for the opposite panel. Don't worry, you just need enough to help hold it in place. There is a final bottom plate that will hold it all together once glued on.
Lastly I want to show you why this project too extra long: I was waiting for magnets. Here are some tiny bolter-guns and search-lights. Careful - some of those parts are delicate. One of mine was broken but luckily the tiny bit was found at the bottom of the box with a clean snap and I could glue it back together.
The lamps can also be made to pivot as long as you're careful with the glue.
Finally here's what I had planned all along...First I use a sharp point to prime a center underneath each bolter and lamp. Then I progressively drill to widen the hole up to about 1/8 inch. I will fit those tiny little magnets you can get at hobby shops... A little bit of putty into the hold and push in the magnet - wait to try. A good trick is too use the entire stack of magnets in your fingers so that you remember exactly which polarity is facing which and you'll also remember to drill and putty the opposite direction later on the opposite part (in my case, which way should face outwards from the spot where I want the guns and lamps to mount).
Naturally, I also took time to drill proper barrels and ports. I don't know why Games Workshop do not do that since the rest of their parts are often so detailed.
And at last, a look at the Fortress before priming and painting.

Tuesday, July 13, 2010

Fortress of Redemption Build 2

Picking up from my previous post, here is the tower coming together.
The main tower assembly comes together very quickly. It is made up of a grand total of 5 pieces. Two walls glue together as I mentioned before. They are large enough to allow for a bit of give but the pieces fit very well so don't be afraid to mash those edges into the corresponding grooves. Then wait for the two tower-halves to dry: they must be solid enough to withstand a bit of rough handling while you fit the two halves together with the roof panel... it's kind of hard to hold while you mess around.
But when it's done, is it ever done!
The plinth is even easier: again 4 walls to make 2 halves. then glue those 2 halves together! From this point on, the tower is almost snap-fit. Feel free to use a lot of glue for this part: those are some big assemblies.The only major assembly for the building left is the walk-way that connects the turret bunker, the tower, and the missile silo. And if you worked on Cities of Death kits before, then you are in familiar territory... but kind of in reverse.
At this particular moment, the commander couldn't help wondering how the assemblies came together. As you can see, I started the walkway but left the missile silo sitting right up against the tower. The walkway starts with the floor and stairs before...
...getting more walls. The stairs go on first, then the walls around it. Each wall squeezes up against the previous to form a solid corner.

This kit features some of the longest and widest single parts I have ever seen from Citadel Miniatures. But impressively, there is no sign of warping and the fit, for pieces large and small, is beautiful. As you build up the walls, each one slots right into the floor and stairs already glued together. But I can't stress enough the basic practice of model kit building: test-fit if you're even unsure. Yes, those stairs do fit in the slots on the wall interiors at an angle. Trust me on that. :-)

Monday, July 12, 2010

Fortress of Redemption Build 1

Here's a look at my latest build. Ever wonder what exactly is in this box? Well... it's this:Stacked neatly and evenly are 8 sprues. Enjoy this for a moment because after clipping the parts off the sprues... this kit will never fit into this box again.Yes, as it turns out, the entire kit is large but in reality very simple. Lots of large panels and the central tower is made up of pretty much 4 solid walls parts. The rest of the bits are for optional decorations like spotlights or heavy-bolter emplacements.
The first hour or so of the build is devoted to the near identical bunkers. In fact, it gets kind of boring when you realize you are essentially doing the same piece 12 times in a row to make their walls. You do get a choice or 3 wall designs and 3 accent pieces to mix and match with. The floors of the bunkers are cleverly molded as the same sprue... upside down. Take care to glue in the 2 different floor cut-outs so that they are flat with the rest of the floor.
If you aren't aligned, you will have trouble fitting the final wall panels. The missile silo is more forgiving since it doesn't form a totally enclosed hemisphere. My turret however needed to have part of its floor shaved down for the last wall to align with the rest of the edges.
Here I got started with the tower... and my commander is eager to check out the new digs. The final tower comes in 4 very large walls. Be careful with the super-glue: less is more. You may need to wiggle the 2 walls around to fit everything and too much glue dripping all over won't help matters. On the up side, the edges wrap around each other. Test fit to see which edge is hidden: the hidden one you can shave and cut as needed. But the other is full of rivet details you need to watch out for when you're shaving your flash.

Next time: tower build mounted on its base, and the walkway...

Sunday, June 20, 2010

Magic "Archenemy" released

Just wanted to post my observations on Magic the Gathering's new offering, “Archenemy.”

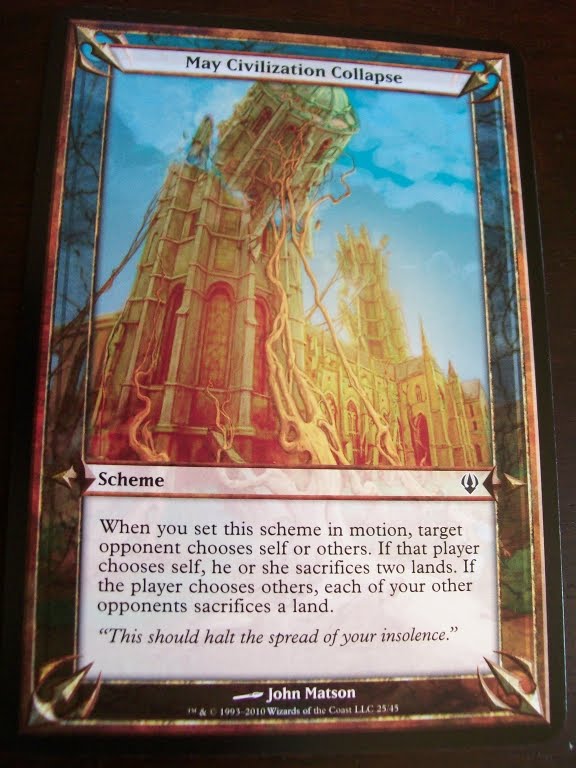
The game format introduces a new card set called the “Scheme” deck. Each of the four themed sets comes with 20 oversized cards. These are not unique but actually a semi-random collection built to best suit the theme of the pre-constructed 60-card play deck that comes with the set. Each card, similar to the Planechase cards triggers at the start of the Archenemy's turn (specifically, sandwiched between the draw step and the first main phase) to give him/her an edge against a team of opponents working together.

Here's an image of a typical Archenemy card:What you are looking at is a single-use “scheme” (it will be replaced next turn). But as you can see when it triggers, its effects will help the Archenemy immensely. It will certainly put a damper on Lilliana Vess, for example.

I chose this to card to make a point: the Archenemy is not all-powerful. In my play-tests on Friday night, we learned a couple of lessons. The first lesson off the bat was this: the wrong scheme at the wrong time can be a disaster. This very card for example, while extremely powerful late in the game, is completely useless when it is drawn early. We had several situations when the Archenemies schemes were simply wasted because there were no valid targets on the battlefield at the time, reducing the Archenemy to a normal solitary player facing a team of players alone.
Another observation we made was that the games are geared towards at most 4 on 1 but no more than that. The fact remains that the Archenemy starts with 40 life points while the team players start with the usual 20. This means the schemes are meant to give just enough boost to the Archenemy that they should be able to deal 60 or 80 life damage and have a reasonable chance for winning.

Finally, I want to remark that any alternate variations suggested by Wizards of the Coast simply don't work without some amount of customization. Most of the schemes are focussed on handling multiple opponents and some even causing dissension between them in particular. So variations like combining Emperor with Archenemies, don't work too well with those if you are a small team playing a single opposing team.

Okay, I lied. There's actually one last observation. Wizards has managed yet again to package an under-powered pre-constructed deck with their sets. Just something to keep in mind if you want to hold a “Magic Party” like I did: everyone should play with other out-of-the-box “virgin” decks. Or else everyone play customized theme decks including the Archenemy player.

Thursday, April 29, 2010

PSP shell swap

As of this month, the Playstation Portable has been out for 5 years (in North America). I didn't get mine at launch, exactly but pretty early on. Yes, I got it with that really bad hockey game.

Anyway, 5 years later and my PSP has seen better days. The battery door isn't so tight anymore. There are cracks and scratches in the faceplate... So I did the most obvious thing to do to a device that has no warranty: I tried to mod it.

I thought, "how hard could changing a shell be?" Heh, right.
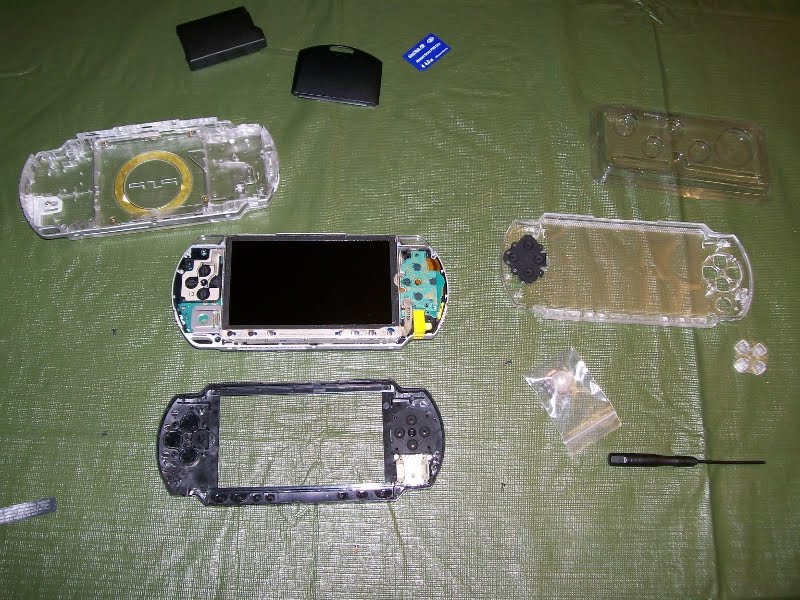
I started with the most obvious step: I turned over my PSP and removed all the screws I could see. The faceplate popped right off. I fitted the new clear stick, clear buttons, and clear D-pad onto their rubber mounts. Then... I examined the back.

And that's when I realized for the first time that while the front faceplate is a bit like the panel on the side of a PC, the PSP's back cover is like the chasis of a PC... this would take a little more time. Thankfully there are plenty of visual guides on Youtube on the disassembly of a PSP.
Before I knew it, I had the front button bar out, the LCD screen, the bracket, the wi-fi, power, sound card, and mobo out. To keep track of every piece and screw, I taped stuff to sheets of paper. The hardest part was changing out the UMD drive... popping the door in and out was a scary affair because despite pulling apart everything, I still didn't want to actually break anything.

Reassembling was easy except for the fact that the new plastic shell doesn't quite exactly line up like the original Sony one. I had to Dremel a bit to get screws to fit.Here's the semi-finished PSP in the new shell. Surprisingly, much of it works - I'm pleased to announce I didn't seriously break any of the circuitry. Unfortunately that's not to say it's perfect.

First, the controls are not as responsive as before... I feel like I need to press the D-pad and the front buttons harder. And the power switch is finicky - sometimes not wanting to turn on or off. But the number one problem I still need to debug: the analog stick is sticking! At first I thought it was the new stick being defective. But after removing the shell and holding the stick down in place, it seems to work fine. Not really sure what else to do...

Sunday, March 21, 2010

Chaos Rising: List of DLC stuff

I just restarted the campaign mode on Chaos Rising once more just to double-check exactly what it was that I got in the supposedly "Exclusive Wargear Pack" from the myTHQ promotion. Now depending where you live, it might be limited (I read somewhere that for THQ UK, only the first 50'000 people who register will get the code to redeem the DLC). On the little insert that came in my retail box (I'm based in Canada, by the way), it simply says "while supplies last" which is kind of funny to think about since these are virtual goods.

So everybody's published and republished the list of items for the Librarian Wargear by now (if you pre-ordered your game as a soft-copy from THQ.com). You get the following 4 items in that one:
  1. Sword of Codicier
  2. Mantle of the Codicier
  3. Tome of Displacement
  4. Obsidian Raven
I don't have any further info other than their names. But I suppose they are a power-weapon, an armour, an accessory, and a command-accessory. And of course, probably all useable only by the new Jonas character who happens to be a Librarian.

Now everybody keeps referring to the other DLC pack as being a Force Commander Wargear pack. It is never stated anywhere in the official literature. The only clues given by THQ is the little set of previously existing icons printed in black and white on the paper insert. I also go by the assumption that while the Techmarines stock your inventory at random when you start a new campaign, the DLC items appear at the bottom of the grid. You should find the following items:
  1. Axe of the Ravens
  2. Fist of Valhalla
  3. Golden Fury of Terra
  4. Pistol of Ideus
  5. Venerated Zeal
  6. Helm of Command
The first five are in the weapons (respectively: power axe, power fist, plasma gun, plasma pistol, an auto-cannon for a dreadnought) and the last is a command accessory (a white helmet).

So you ask, are they worth it? To be honest, I'm sure yet. At a glance the new weapons don't have much higher stats that the others you might find during play. For example, my version of Davian Thule as a Dreadnought imported from the first Dawn of War 2 game save already had a powerful auto-cannon equipped with exactly the same stats as Venerated Zeal. However Venerated Zeal also gives a couple of boosts to the percentage chance "Scatter". And one could safely assume that the other items also have such minor boosts compared their same-stat counterparts. The item I'm torn over is the Helm of Command which sounds great (gives boosts to nearby units) but I just love my Force Commander wearing his jump-pack...

Thursday, March 18, 2010

Chaos Rising is out... and I still can't enjoy it

I still have this bitter taste in my mouth 2 days later.

All of it thanks to this annoying screw-up with Games For Windows Live to get my free exclusive DLC. This Dawn of War release did not force you to pre-order like the original DoW2. Instead all you need to do is register your game at the publisher's site at http://www.thq.com - you'll need to sign up for a "MyTHQ" account, but that's free anyway and you'll never need it again afterwards.
THQ promises exclusive content and free stuff when you sign up, but in reality thus far I've only downloaded a free wallpaper JPG and a PDF for a print-your-own poster for Soulstorm. And that was two years ago. Lame.
Anyhow, the way it works is that when you register your game (it's listed under "W" for "Warhammer" so don't panic if you don't find it in the drop-down list under either "C" or "D"), a new code will appear next to your listing for Dawn of War 2: Chaos Rising.

Then go to Games for Windows Live - you remember that applet from when you installed the first game and tried to get the exclusive pre-order content, don't you? I sure remember. But you know what's funny? GFWL didn't seem to remember ME!

That is, it would not recognize my password. No, I'm not some kind of computer illiterate. But I think I should be allowed to complain. I logged in before, and I'm not in the habit of altering the settings on my machine. So whatever between the installation of the previous game and this one, shouldn't be my fault in any way. I say this because...

Well, PC gamers tend to be somewhat elitist. There was a time when you had to know your way around an OS (DOS!) if you wanted to get into gaming. PC gamers had a certain right to turn their noses up at consoles because it honestly did take more effort than to pop a cartridge into a slot. But here's the thing: life just shouldn't be that difficult. The days of rudimentary interfaces requiring a knowledge of low-level configuration should be over.

I was appalled when my research into this login failure turned up forum threads (strangely, forums in the GFWL site but not linked to via the Help area) with dozens of users all in the same problem. Clearly others were having more difficulty (such as getting the game to run multiplayer), but I was one of many working all evening on GFWL. Even worse, making my eyes just about pop out of my head, were the suggested solutions like running REGSRV32 on a variety of DLLs or even resetting WINSOCK. I wanted to check my calendar to be sure it wasn't still 1995.

I think the point I'm really getting at is that GFWL is basically just a glorified browser. It shouldn't this complicated. There's another app out there doing something very similar... you may have heard of it. It's called Steam. And it does it well. I've never had a configuration problem with Steam. So I have to ask, why is the code in GFWL so low-level that it's depending everything from OS-level services to port-forwarding on your router?
For the record, I eventually did get GFWL working. I had to get into Vista's Network settings via IE6's Tools and Options menus. Then in Connections, I checked Auto-detect LAN settings, then unchecked it again. And suddenly (no this is not logical to me either), GFWL let me log in.
I haven't been much in the mood to play this game since Tuesday.

Tuesday, October 06, 2009

Imperial Guard Valkyrie 4

The Valkyrie build was delayed for a variety of reasons, but here's the final follow up.
First I wanted to turn the kit over and present possibly the ONLY image of the underside of the model anywhere. It's not clear from the instruction sheet nor from the photos. But the hatches don't have anything holding them in place until you finally put the wings and tail fins in place. Once everything's together, the hatches sort of get sandwiched in the grooves naturally. You'll wonder how it wasn't so obvious before you test-fit everything.Another trick I had to ask for help with is the canopy over the cockpit. Firstly, do the easy thing: base coat the "window frame" bits first. Just remember to leave the underside unpainted because that's where your glue will make contact! While you're at it, carefully tape off the windows leaving only the horizontal cross-bars that are molded into the clear plastic. These "bumps" will form part of the frames on the finished model so you'll need to paint that too.Here's a shot of the finished canopy resting on top of the cockpit assembly. Don't glue it in place yet!
Why not, you may ask? I painted the interior first for a reason. The finished canopy will serve as a conveniently cockpit-shaped template. How? Here's an easy trick for basecoating: wrap the finished canopy in plastic-food-wrap then sit it on top of the cockpit you want to protect. Plastic wrap is easy to hold together and easier to remove when you're done spraying!And finally... the photos you've been waiting for. This is after a coat of black, then a dusting coat of generic olive-drab green. A touch of randomness is done by holding up a sheet of card-stock with holes in it. And a final touch: sky-gray on the bottom... look it up, there's a reason for this paint scheme on military aircraft. Finally weathering is done with a combination of more chaos black, tin bitz, and boltgun metal from Citadel Colour paints.

Monday, July 20, 2009

Lament for Lunar

To mark the 40th anniversary of the Apollo lunar landing, I will take this time to lament the Lunar game franchise. Lunar is possibly the saddest franchise in gaming. It came and went and then came again huge... and then went again. It tried and failed for a three-peat. You probably missed Lunar. But for those of us lucky enough to have experienced The Silver Star Story, it was amazing and here are some pics of my copy of it.The games were originally Sega CD releases. One of the early attempts at using CD for console gaming, this was a Genesis add-on drive. The games were packed epics and featured lengthy cut-scenes to drive the plot. Many years later, the games were remade and featured full-frame anime cinematics to bring everything to life.Silver Star Story Complete came on 2 game discs, an audio CD soundtrack with songs and all the rerecorded music, and a PS1-proprietary format disc that played a half-hour behind-the-scenes video. The box also contained a hardback manual featuring a partial walkthrough and a cloth map of the fictional world.The sequel, Eternal Blue Complete, also made a return engagement with even more ridiculousness. It included a box of stuff like a soundtrack CD and a replica medallion worn by the heroine.Sadly, that was the final hurrah for Lunar. When "Dragon Song" appeared on DS, it was so far removed from that time-line, it was hardly recognizable anymore. In fact, I think the saddest thing about this is that the remakes video renders were so good (beyond 16-bit, but before DVD existed). As it was, the game was English-only including dubbed songs (while the singer has a sweet voice, she had some very awkward lyrics to work with). It would be another few years before I managed to find MP3s of the Japanese songs. The Lunar franchise is a relic of the 90's and we can only wonder if it will ever rise again.

Sunday, July 05, 2009

Imperial Guard Valkyrie 3

Easily the most irritating assembly of every vehicle kit I've ever built in my life, is the cockpit. You reach a point where everything is down to an art-form and a science. But every kit throws a little something different at you. The Valkyrie is no different.
As with many cockpit assemblies, the Valkyrie uses the usual "fake legs" pilot figures. These pilots have no feet. They're just torsos with arms and heads. The tough choice tackling a new sculpt is trying to figure out what you can get away with because you know certain bits will be forever hidden from view once it's done.
As you can see, the most visible parts are the heads and the control panels. In fact, you could mostly get away with base-coating the arms entirely. That said, as is typical, the easiest way to work with a cockpit is to do the paint details by dry-brushing before putting the assembly into the rest of the nose of the vehicle.
Also to note, the biggest display screen on the RIO's panel? Just use a bit of yellow to fake some tactical info. When the canopy is in place you'll barely be able to tell what's there anyway.