Showing posts with label WH40K. Show all posts

Saturday, March 05, 2011

Fortres of Redemption Build 3

I didn't forgot about this build, but a bunch of events conspired to keep me away from this project.
One more look at the walk-way: as you can see now on the completed piece, all the panels cleverly lean into each other. The angles are almost snap-fit.

The turret is the last major assembly to do. This is where Games Workshop's design experience shines. To minimize the number of molds, almost all parts in this kit are double-sided: the turret mount is actually the missle-silo upside-down. And a majority of the parts of the turret itself is symmetrical so all the pieces. For example, the drum is made of 2 halves and the cannons of 2 pairs of left and right halves.
This step is very time-consuming as I recommend allowing ample time to dry. Use only 2 drops of glue per panel. And I cannot stress enough: always test-fit! The turret is full of moving parts so a single bit of errant glue will ruin your day.
Fit the drum into groove within the housing and then just a small drop of glue for the opposite panel. Don't worry, you just need enough to help hold it in place. There is a final bottom plate that will hold it all together once glued on.
Lastly I want to show you why this project too extra long: I was waiting for magnets. Here are some tiny bolter-guns and search-lights. Careful - some of those parts are delicate. One of mine was broken but luckily the tiny bit was found at the bottom of the box with a clean snap and I could glue it back together.
The lamps can also be made to pivot as long as you're careful with the glue.
Finally here's what I had planned all along...First I use a sharp point to prime a center underneath each bolter and lamp. Then I progressively drill to widen the hole up to about 1/8 inch. I will fit those tiny little magnets you can get at hobby shops... A little bit of putty into the hold and push in the magnet - wait to try. A good trick is too use the entire stack of magnets in your fingers so that you remember exactly which polarity is facing which and you'll also remember to drill and putty the opposite direction later on the opposite part (in my case, which way should face outwards from the spot where I want the guns and lamps to mount).
Naturally, I also took time to drill proper barrels and ports. I don't know why Games Workshop do not do that since the rest of their parts are often so detailed.
And at last, a look at the Fortress before priming and painting.

Tuesday, March 01, 2011

Warhammer and candy

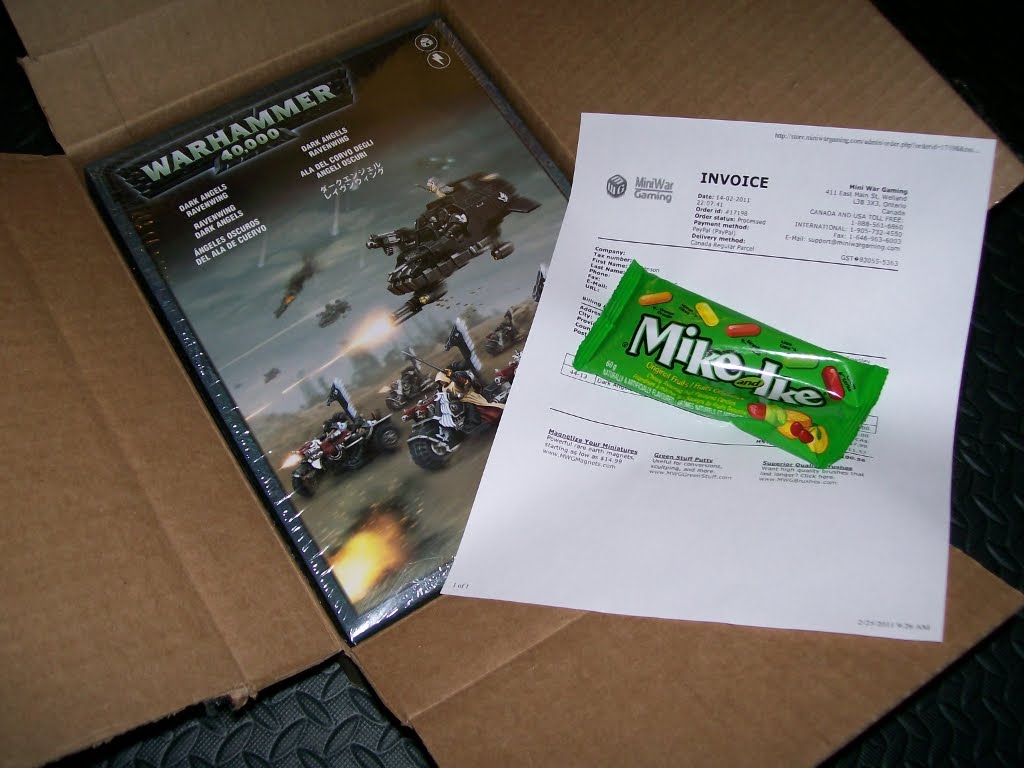
I arrived home tonight and in a stroke of perfect timing (unless he was waiting for me, in which case it's kind of creepy) the mailman drove right up as I got out of my car and delivered my package.

I was already expecting this thanks to the tracker information I had. But what I wasn't expecting when I opened the box later was this:
Yes, for some reason the dudes at MiniWarGaming decided to throw in some candy. Which, I suppose is cool. But it's also weird. At first I thought, "that's a clever shock-absorber" but then it occured to me it wouldn't work too well since the rest of the box is fairly snug. So I think I'll just assume it was just them being nice.

Tuesday, July 13, 2010

Fortress of Redemption Build 2

Picking up from my previous post, here is the tower coming together.
The main tower assembly comes together very quickly. It is made up of a grand total of 5 pieces. Two walls glue together as I mentioned before. They are large enough to allow for a bit of give but the pieces fit very well so don't be afraid to mash those edges into the corresponding grooves. Then wait for the two tower-halves to dry: they must be solid enough to withstand a bit of rough handling while you fit the two halves together with the roof panel... it's kind of hard to hold while you mess around.
But when it's done, is it ever done!
The plinth is even easier: again 4 walls to make 2 halves. then glue those 2 halves together! From this point on, the tower is almost snap-fit. Feel free to use a lot of glue for this part: those are some big assemblies.The only major assembly for the building left is the walk-way that connects the turret bunker, the tower, and the missile silo. And if you worked on Cities of Death kits before, then you are in familiar territory... but kind of in reverse.
At this particular moment, the commander couldn't help wondering how the assemblies came together. As you can see, I started the walkway but left the missile silo sitting right up against the tower. The walkway starts with the floor and stairs before...
...getting more walls. The stairs go on first, then the walls around it. Each wall squeezes up against the previous to form a solid corner.

This kit features some of the longest and widest single parts I have ever seen from Citadel Miniatures. But impressively, there is no sign of warping and the fit, for pieces large and small, is beautiful. As you build up the walls, each one slots right into the floor and stairs already glued together. But I can't stress enough the basic practice of model kit building: test-fit if you're even unsure. Yes, those stairs do fit in the slots on the wall interiors at an angle. Trust me on that. :-)

Monday, July 12, 2010

Fortress of Redemption Build 1

Here's a look at my latest build. Ever wonder what exactly is in this box? Well... it's this:Stacked neatly and evenly are 8 sprues. Enjoy this for a moment because after clipping the parts off the sprues... this kit will never fit into this box again.Yes, as it turns out, the entire kit is large but in reality very simple. Lots of large panels and the central tower is made up of pretty much 4 solid walls parts. The rest of the bits are for optional decorations like spotlights or heavy-bolter emplacements.
The first hour or so of the build is devoted to the near identical bunkers. In fact, it gets kind of boring when you realize you are essentially doing the same piece 12 times in a row to make their walls. You do get a choice or 3 wall designs and 3 accent pieces to mix and match with. The floors of the bunkers are cleverly molded as the same sprue... upside down. Take care to glue in the 2 different floor cut-outs so that they are flat with the rest of the floor.
If you aren't aligned, you will have trouble fitting the final wall panels. The missile silo is more forgiving since it doesn't form a totally enclosed hemisphere. My turret however needed to have part of its floor shaved down for the last wall to align with the rest of the edges.
Here I got started with the tower... and my commander is eager to check out the new digs. The final tower comes in 4 very large walls. Be careful with the super-glue: less is more. You may need to wiggle the 2 walls around to fit everything and too much glue dripping all over won't help matters. On the up side, the edges wrap around each other. Test fit to see which edge is hidden: the hidden one you can shave and cut as needed. But the other is full of rivet details you need to watch out for when you're shaving your flash.

Next time: tower build mounted on its base, and the walkway...

Sunday, March 21, 2010

Chaos Rising: List of DLC stuff

I just restarted the campaign mode on Chaos Rising once more just to double-check exactly what it was that I got in the supposedly "Exclusive Wargear Pack" from the myTHQ promotion. Now depending where you live, it might be limited (I read somewhere that for THQ UK, only the first 50'000 people who register will get the code to redeem the DLC). On the little insert that came in my retail box (I'm based in Canada, by the way), it simply says "while supplies last" which is kind of funny to think about since these are virtual goods.

So everybody's published and republished the list of items for the Librarian Wargear by now (if you pre-ordered your game as a soft-copy from THQ.com). You get the following 4 items in that one:
  1. Sword of Codicier
  2. Mantle of the Codicier
  3. Tome of Displacement
  4. Obsidian Raven
I don't have any further info other than their names. But I suppose they are a power-weapon, an armour, an accessory, and a command-accessory. And of course, probably all useable only by the new Jonas character who happens to be a Librarian.

Now everybody keeps referring to the other DLC pack as being a Force Commander Wargear pack. It is never stated anywhere in the official literature. The only clues given by THQ is the little set of previously existing icons printed in black and white on the paper insert. I also go by the assumption that while the Techmarines stock your inventory at random when you start a new campaign, the DLC items appear at the bottom of the grid. You should find the following items:
  1. Axe of the Ravens
  2. Fist of Valhalla
  3. Golden Fury of Terra
  4. Pistol of Ideus
  5. Venerated Zeal
  6. Helm of Command
The first five are in the weapons (respectively: power axe, power fist, plasma gun, plasma pistol, an auto-cannon for a dreadnought) and the last is a command accessory (a white helmet).

So you ask, are they worth it? To be honest, I'm sure yet. At a glance the new weapons don't have much higher stats that the others you might find during play. For example, my version of Davian Thule as a Dreadnought imported from the first Dawn of War 2 game save already had a powerful auto-cannon equipped with exactly the same stats as Venerated Zeal. However Venerated Zeal also gives a couple of boosts to the percentage chance "Scatter". And one could safely assume that the other items also have such minor boosts compared their same-stat counterparts. The item I'm torn over is the Helm of Command which sounds great (gives boosts to nearby units) but I just love my Force Commander wearing his jump-pack...

Thursday, March 18, 2010

Chaos Rising is out... and I still can't enjoy it

I still have this bitter taste in my mouth 2 days later.

All of it thanks to this annoying screw-up with Games For Windows Live to get my free exclusive DLC. This Dawn of War release did not force you to pre-order like the original DoW2. Instead all you need to do is register your game at the publisher's site at http://www.thq.com - you'll need to sign up for a "MyTHQ" account, but that's free anyway and you'll never need it again afterwards.
THQ promises exclusive content and free stuff when you sign up, but in reality thus far I've only downloaded a free wallpaper JPG and a PDF for a print-your-own poster for Soulstorm. And that was two years ago. Lame.
Anyhow, the way it works is that when you register your game (it's listed under "W" for "Warhammer" so don't panic if you don't find it in the drop-down list under either "C" or "D"), a new code will appear next to your listing for Dawn of War 2: Chaos Rising.

Then go to Games for Windows Live - you remember that applet from when you installed the first game and tried to get the exclusive pre-order content, don't you? I sure remember. But you know what's funny? GFWL didn't seem to remember ME!

That is, it would not recognize my password. No, I'm not some kind of computer illiterate. But I think I should be allowed to complain. I logged in before, and I'm not in the habit of altering the settings on my machine. So whatever between the installation of the previous game and this one, shouldn't be my fault in any way. I say this because...

Well, PC gamers tend to be somewhat elitist. There was a time when you had to know your way around an OS (DOS!) if you wanted to get into gaming. PC gamers had a certain right to turn their noses up at consoles because it honestly did take more effort than to pop a cartridge into a slot. But here's the thing: life just shouldn't be that difficult. The days of rudimentary interfaces requiring a knowledge of low-level configuration should be over.

I was appalled when my research into this login failure turned up forum threads (strangely, forums in the GFWL site but not linked to via the Help area) with dozens of users all in the same problem. Clearly others were having more difficulty (such as getting the game to run multiplayer), but I was one of many working all evening on GFWL. Even worse, making my eyes just about pop out of my head, were the suggested solutions like running REGSRV32 on a variety of DLLs or even resetting WINSOCK. I wanted to check my calendar to be sure it wasn't still 1995.

I think the point I'm really getting at is that GFWL is basically just a glorified browser. It shouldn't this complicated. There's another app out there doing something very similar... you may have heard of it. It's called Steam. And it does it well. I've never had a configuration problem with Steam. So I have to ask, why is the code in GFWL so low-level that it's depending everything from OS-level services to port-forwarding on your router?
For the record, I eventually did get GFWL working. I had to get into Vista's Network settings via IE6's Tools and Options menus. Then in Connections, I checked Auto-detect LAN settings, then unchecked it again. And suddenly (no this is not logical to me either), GFWL let me log in.
I haven't been much in the mood to play this game since Tuesday.

Wednesday, January 27, 2010

Reaction: Fast Attack Bag

Unlike its bigger brother, the "Tactical Pack," Fast Attack Bag does away with the theme name. I would have called it a “utility bag” if I were in charge of such things. It's exactly that: designed to be utilitarian for the hobbyist on the go.
On the surface, Fast Attack Bag is a messenger bag with a “Fast Attack” unit choice symbol on the front flap along with rubber Imperial eagle logo on the front.
It is entirely functional. The flap is held down by velcro. Under the flap is a series of mesh pockets. Two are velcro-shut and the third with a zipper. Unfortunately, the flap itself is not a pocket. The main compartment is a fairly stiff structure and is easily accessible by zipper on the back so the flap doesn't even need to open clumsily if the bag is slung over one's shoulder.
The main gimmick of this bag is the insert that it comes with. The Fast Attack Bag has an insert specifically designed for miniatures enthusiasts. The top half is zipper pocket with a “egg-carton” foam insert. Together with the stiff main compartment, in-progress miniatures will be well-protected. The bottom half is a tool-kit organizer. Elastics sewn into the insert can hold up to 15 Citadel-brand paint-jars, a pair of snips, knives, and even security containers of super-glue. Finally, there is a sleeve system for brushes.
There appear to be only a few short-comings to the Fast Attack Bag. Firstly, there's no handle commonly on most messenger bags of its type. Then again, since the main flap is held by only velcro, this probably for the best. The shoulder strap, while adjustable, is sewn directly onto the body. That means any accidental twists need to be straightened out before wearing the bag.

Saturday, January 09, 2010

Reaction: Tactical Back-Pack

I don't remember much of 1989. I do however, remember the disdain I had for the official Nintendo Game Boy Carry Case. The literature for that case promised room to protect my portable device along with storing some games, my earphones, and even the network cable. But in truth, only the games had dedicated pockets; the rest could only be haphazardly stuffed into the main compartment. That feeling of disappointment has followed me around for 20 years.
I was skeptical when Games Workshop put out a series of “gaming-luggage.” They claimed that this lugguge was exactly what I need to take my tabe-top war on the road. They even themed the luggage after the unit types of a Space Marine army (Fast Attack for the smaller courier-bag up to Heavy Support for the large duffel).

When collapsed, the Tactical Backpack sports a leatherette “arrow symbol” of the Space Marines “Troops” unit choice. The pack also features rubber patches of the Imperial Aquila on the straps and on the back. And typical of most backpacks of this type, the pack features light padding in all the usual places.

As a very pleasant surprise, it does exactly what it promises.

The first specialized compartment on the Tactical Backpack is the expanding pocket on the outer shell. The Troops symbol unbuttons to release a pocket about 3 inches thick. This is just the right size for either 2 layers of standard foam storage trays of figures or a 1 thick one for vehicles! Trays can either be the official Citadel trays or even the Sabol brand trays which work just as well. The buttons secure to a second set of hidden snaps so that the panels don't hang loose.Inside the main compartment are a series of smartly-designs pockets. The first is a large flat mesh pocket inside the flap excellent for the one item I could never find a storage solution for: the oversized Apocalypse weapon templates.
Inside the back-panel are pockets for game essentials. There are 2 large flat padded slots for rulebooks. And finally, there are 4 mesh pockets, which (probably by design) exactly fit the Games Workshop dice-tins. The overall main compartment is also expandable. But I don't recommend overloading it. The securing traps go under the main zipper instead of over it, which means the zipper is the only thing holding all that weight you may be tempted to put inside.
About the only complaint is that other than those very specialized pockets, there aren't any other pockets to speak of. My zip-lock baggies of markers will have to simply get dropped into the main compartment.
Overall, while one could certainly live without this pack (I've been playing WH40K for over 5 years while making do with cardboard boxes from Ikea), it is certainly well worth the investment if one does a lot of travelling with a small army.

Tuesday, October 06, 2009

Imperial Guard Valkyrie 4

The Valkyrie build was delayed for a variety of reasons, but here's the final follow up.
First I wanted to turn the kit over and present possibly the ONLY image of the underside of the model anywhere. It's not clear from the instruction sheet nor from the photos. But the hatches don't have anything holding them in place until you finally put the wings and tail fins in place. Once everything's together, the hatches sort of get sandwiched in the grooves naturally. You'll wonder how it wasn't so obvious before you test-fit everything.Another trick I had to ask for help with is the canopy over the cockpit. Firstly, do the easy thing: base coat the "window frame" bits first. Just remember to leave the underside unpainted because that's where your glue will make contact! While you're at it, carefully tape off the windows leaving only the horizontal cross-bars that are molded into the clear plastic. These "bumps" will form part of the frames on the finished model so you'll need to paint that too.Here's a shot of the finished canopy resting on top of the cockpit assembly. Don't glue it in place yet!
Why not, you may ask? I painted the interior first for a reason. The finished canopy will serve as a conveniently cockpit-shaped template. How? Here's an easy trick for basecoating: wrap the finished canopy in plastic-food-wrap then sit it on top of the cockpit you want to protect. Plastic wrap is easy to hold together and easier to remove when you're done spraying!And finally... the photos you've been waiting for. This is after a coat of black, then a dusting coat of generic olive-drab green. A touch of randomness is done by holding up a sheet of card-stock with holes in it. And a final touch: sky-gray on the bottom... look it up, there's a reason for this paint scheme on military aircraft. Finally weathering is done with a combination of more chaos black, tin bitz, and boltgun metal from Citadel Colour paints.

Sunday, September 13, 2009

Planetstrike kits

Today I'm bringing you a look at the Planetstrike scenery kits (which if you got a chance to check out the new expansion book, serve as more than just scenery). We'll start with the Aegis Defense Line kit.As you can see, there's very little to the set. There are 4 long walls and 4 short ones coming on a pair of sprues. Slap some paint on and you're done. The only thing to assemble is the quad-cannon model which will come in handy if you decide to leave the base and the gun unglued. The Planetstrike line has a common feature in most parts: the hatches or mounts for turrets are all the same size so they're interchangeable.
The Imperial Bastion comes on 6 sprues. The walls for the main structure are on 2 pairs while the rest of the stuff including the Comms Relay and Lascannon are on their own.
The first thing to do is to start with adding corner joints - you need that angle to start off the structure just like the Cities of Death kits from a few years ago. Next, use a main deck panel to help text fit the walls together, this will help get as close to a proper 90-degree angle as possible.Don't worry about perfection. The plastic has just enough give that you will be able to press the next parts together on top. More importantly, lay down the deck without glue. Friction between levels will keep the parts together! And that's how this kit becomes modular as described in the Planetstrike book. Just remember to test-fit everything on top of the previous level and glue only the walls you want to hold. In the end, you end up with this:
Note the deck panels are reversible so you have the option of reassembling the Bastion with or without the mounting point on the roof like so:Of course, building the kit to take advantage of its modular nature means you can do this (using the quad-cannon from the Aegis Defense Line kit and removing the middle level from the Bastion):
Or change the prop on the roof to suit the mission scenario you are playing:


Or try to use everything since the Bastion kit comes with a variety of ground-deployment bases. Mix and match parts to offer some dynamic looking setups.


Remember, if you shop smart, you can assemble an Imperial Strongpoint (a limited direct-market release from earlier this year) simply buy collecting 2 Bastion kits and 3 Aegis Defense Lines. It's tricky, but it can be done for the same price as the limited offer.