Monday, March 07, 2011

Sideshow Collectibles Clone Trooper

I'll be honest: I did not plan this. I was serious when I thought the prices would be a deterrent to buying too many of these Premium Format series sculptures. And even then I thought, "I'll limit myself to collecting only the generic troops." I seriously didn't know a Clone Trooper would be released within 2 months of deciding I would buy the Scout Trooper.The decision came down to this simple fact: buy it now or buy it later at a huge mark-up. I bought it now and it didn't cost anywhere near what a paid for the previous statue. I even got the "Episode III" exclusive head option.
Unlike the Scout Trooper there never was a physical costume at Lucasfilm for the Clone armoured troops - it was always a CG render in the films. So Sideshow's challenge was to make an interpretation of the suit where all the edges worked together without "cheating." Compared to the Scout Trooper, there's a lot less fabric parts of this figure and generally a lot less details to miniaturize.
It does feature weathering details - the armour is not a pure white but is covered in a brown of Geonosis dust. He wears a textured body-suit under the armour. And of course, carries a standard-issue rifle. The junked Seperatist battle-droid arm on the ground is also an exclusive option (the statue does come with a "plug" to hide the hold where the optional arm plugs into the base).
Of course, he does come with the regular "Episode 2" head to in case for some reason you got the exclusive version without wanting it...
But why would you do that?

Saturday, March 05, 2011

Fortres of Redemption Build 3

I didn't forgot about this build, but a bunch of events conspired to keep me away from this project.
One more look at the walk-way: as you can see now on the completed piece, all the panels cleverly lean into each other. The angles are almost snap-fit.

The turret is the last major assembly to do. This is where Games Workshop's design experience shines. To minimize the number of molds, almost all parts in this kit are double-sided: the turret mount is actually the missle-silo upside-down. And a majority of the parts of the turret itself is symmetrical so all the pieces. For example, the drum is made of 2 halves and the cannons of 2 pairs of left and right halves.
This step is very time-consuming as I recommend allowing ample time to dry. Use only 2 drops of glue per panel. And I cannot stress enough: always test-fit! The turret is full of moving parts so a single bit of errant glue will ruin your day.
Fit the drum into groove within the housing and then just a small drop of glue for the opposite panel. Don't worry, you just need enough to help hold it in place. There is a final bottom plate that will hold it all together once glued on.
Lastly I want to show you why this project too extra long: I was waiting for magnets. Here are some tiny bolter-guns and search-lights. Careful - some of those parts are delicate. One of mine was broken but luckily the tiny bit was found at the bottom of the box with a clean snap and I could glue it back together.
The lamps can also be made to pivot as long as you're careful with the glue.
Finally here's what I had planned all along...First I use a sharp point to prime a center underneath each bolter and lamp. Then I progressively drill to widen the hole up to about 1/8 inch. I will fit those tiny little magnets you can get at hobby shops... A little bit of putty into the hold and push in the magnet - wait to try. A good trick is too use the entire stack of magnets in your fingers so that you remember exactly which polarity is facing which and you'll also remember to drill and putty the opposite direction later on the opposite part (in my case, which way should face outwards from the spot where I want the guns and lamps to mount).
Naturally, I also took time to drill proper barrels and ports. I don't know why Games Workshop do not do that since the rest of their parts are often so detailed.
And at last, a look at the Fortress before priming and painting.

Tuesday, March 01, 2011

Warhammer and candy

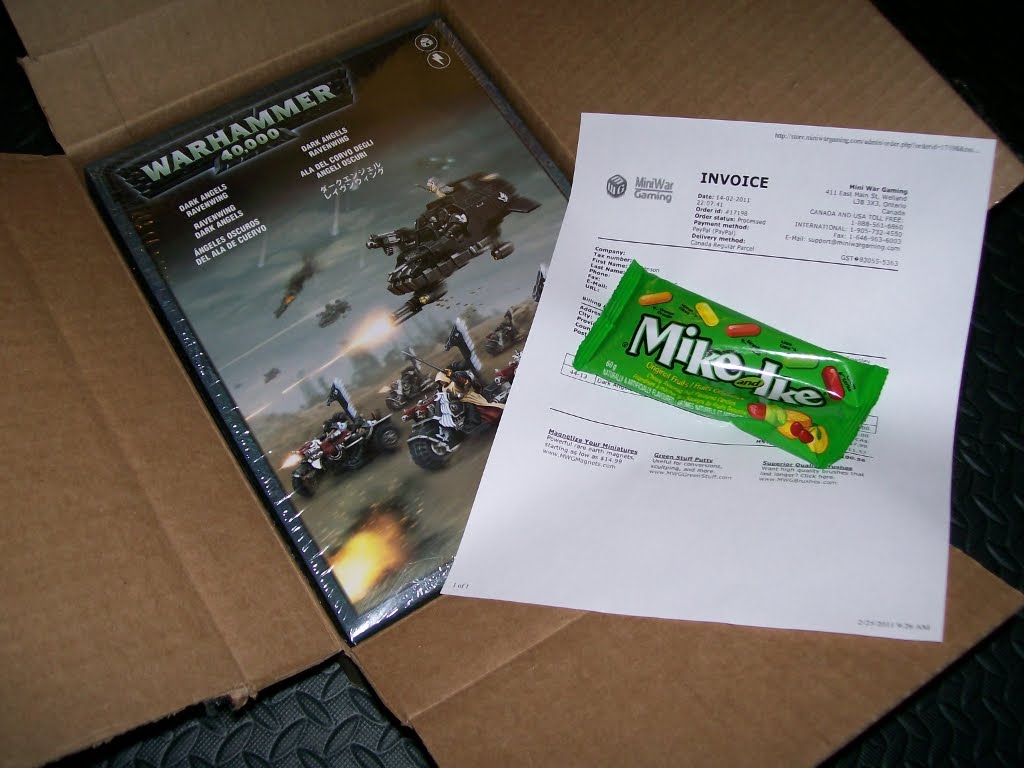
I arrived home tonight and in a stroke of perfect timing (unless he was waiting for me, in which case it's kind of creepy) the mailman drove right up as I got out of my car and delivered my package.

I was already expecting this thanks to the tracker information I had. But what I wasn't expecting when I opened the box later was this:
Yes, for some reason the dudes at MiniWarGaming decided to throw in some candy. Which, I suppose is cool. But it's also weird. At first I thought, "that's a clever shock-absorber" but then it occured to me it wouldn't work too well since the rest of the box is fairly snug. So I think I'll just assume it was just them being nice.

Thursday, January 27, 2011

Sideshow Collectibles Scout Trooper

I came to a collector's impasse this past month. Expecting a big overtime pay-out, I wanted to treat myself to something cool and unusual. I looked into high-end collectible "dolls." These 1/6 scale figures are highly detailed and stupidly expensive (often 2 or 3 times the price of Barbie special editions). The problem is that even the 1/6 scales are a dime a dozen: there are literally hundreds to choose from and my local comic book shop alone stocks several lines. I picture myself succumbing to temptation and having yet another army begging for shelf-space.
But at the top of the heap is Sideshow Collectibles "Premium Format" statue line. Each one is sculpted by an entire team of artists from
traditional poly-stone casting and metal-work to stitched cloth pieces and paint-detailing. Not to mention severely limited production runs.I decided in the end that this was the figure for me: it fits right in with my armoured/mechanized character goods and it's Star Wars. And it's even more stupid-expensive than even I'm usually comfortable with so I won't be tempted to buy too often.
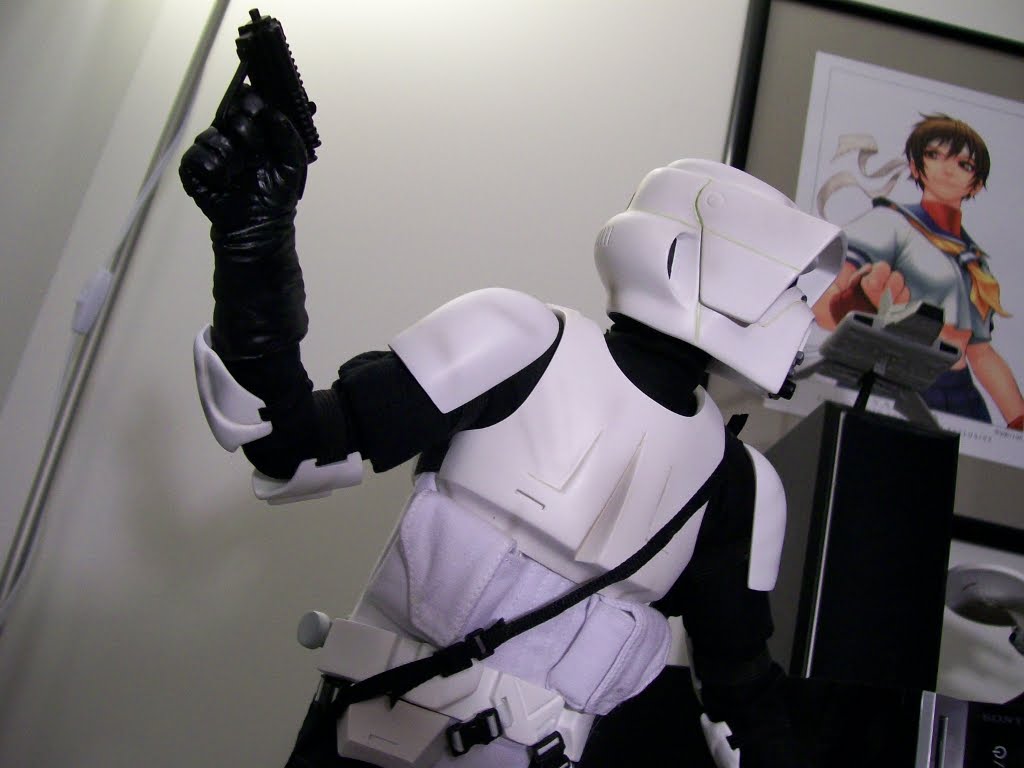
This is the Scout Trooper from Return of the Jedi. He's the first "troop" character from the line-up (not counting the older speeder-bike riding version). The Scout Trooper features the usual body-suit, padded vest, strapped on armour, and utility-belt. All miniaturized to 1/4 scale. He also features weathering effects painted on his clothes giving him a just-served-his-tour-on-Endor-moon look.

My version is the "exclusive edition" that came with a sniper rifle accessory. I'm a little annoyed that this is the only part that's exclusive about it. I was willing to pay a bit more than market value because it's a limited run of only 300 (mine is hand-numbered #102 on the base). However, in truth there are 850 of these because there were 550 others that are renumbered and packaged without the rifle.
As can be seen in the first pic, yes, for the first time my old PS3 looks small by comparison. I can be fairly confident I won't be buying too many of these again soon.

Saturday, January 08, 2011

Yamato SDF-1 Macross in 1/3000

I admit I've been pretty lazy with the blog lately choosing instead to post comments on new stuff to forums or an odd pic on Facebook. But since Macross is a series near and dear to my heart, I felt I may as well do a repost of some comments and photos I made over on Robot Japan.

Almost a year ago Yamato teased everyone with an oversized 2 foot long SDF-1 prototype model. For those unaware, toy-designers often build prototypes larger than the final product in order to work out the fine details before scaling it down for production. Well, after the news broke, and people showed enough interest, Yamato actually made a limited run of the master mold in its original 1/2000 scale glory. For your thousands of dollars, you didn't even get a complete toy - you got the parts of the prototype to build your own 2-foot-long model.

I'm not that crazy, so I waited on a pre-order to get the final production version. It's slightly smaller in 1/3000 scale and still doesn't come fully assembled.


That's right, it is remarkably accurate in scale next to the Macross Quarter by Bandai (that one was advertized to be 1/750 scale, which, when the math is done, makes perfect sense).

To give a sense of size (not scale) here are some pics I posted on Robot Japan.
First is the "Storm Attacker" Mode next to a bunch of other Macross figures.

From left to right: 1/60 Destroid, 1/750 Macross Quarter, 1/3000 SDF1, 1/48 Valkyrie, 1/100 Battle-pod.


Not to scale: a Revoltech Giant Robo, a Soul of Chogokin EVA-01, a Brave Gokin Alphonse, Takara's Masterpiece Optimus Prime, and a Max Gokin Godannar.

A few comments: despite being well packed in a classic styrofoam tray, SDF-1 will never be mint in box again once taken out. There are simply too many parts that need to be assembled with glue or else they will pop off. What parts? Well screw covers for one thing. That's right, this is Yamato's final say on the classic anime icon and they did it right. It's so small-scale yet they thought of including a bunch of bits and pieces to hide even the screws!

It's mostly plastic but it's just right. No overly heavy limbs or accessories. Sadly during the photography session, the transformation of the Quarter resulted in the loss the main-gun (i.e. it disconnected itself and fell to the floor, causing a bent tip).
SDF1 will not have this problem. It's delicate where it needs to be (the bridge module up top), but also heavy where it should be (in the torso and legs). It's not as beefy as Optimus Prime despite being larger overall, but that hardly matters. The same design made of metal would have been dangerously unwieldy.

Overall, I'm really happy this finally came out the way it did. For a detailed look at this thing, check out Graham's insane coverage at Macrossworld!